networking အေျကာင္းေလ႕လာလိုလ်င္ဒီေနရာေလးမွာေလ႕လာနိဳင္ပါတယ္

သင္႕ေမာ္နီတာကိုအခ်ိန္ျကာျမင္႕စြာျကည္႕ႏိုင္ေအာင္ဒီေဆာ႕၀ဲေလးကိုသုံးျကည္႕ပါ

စာအုပ္ေတြကို ဒီေနေလးမွာေလ႕လာနိဳင္ပါတယ္

မိုဘိုင္းနဲ႕ ပက္သက္ရင္ ဒီေနေလးမွာေလ႕လာအကူအညီေတာင္းနိဳင္ပါတယ္

Tuesday, January 28, 2014

ေမာ္နီတာကုိ ၾကာၾကာၾကည္႔ေစႏုိင္ဖုိ႔ ဒါကုိသုံးပါ...

အားလုံးပဲ မဂၤလာပါခင္ဗ်ာ.
ဒီတစ္ခါေတာ႔ ကြန္ျပဴတာနဲ႔ အျမဲတေစ ထိေတြ႔ကုိင္တြယ္ အသုံးျပဳေနရတဲ႔ ညီအစ္ကုိေမာင္ႏွမေတြအတြက္ က်န္းမာေရးအရ အသုံးတည္႔မယ္႔ ေဆာ႔ဖ္၀ဲလ္ေလးတစ္ခု လက္ဆင္႔ကမ္းမွ်ေ၀ခ်င္ပါတယ္.
ကြန္ျပဴတာကုိ အျမဲလုိလုိအသုံးျပဳေနရသူေတြမွာ ျဖစ္တတ္တာေတြက အေညာင္းမိတာ၊ ခါးနာတာ၊ မ်က္ရည္ပူေတြ က်လာတာ စတဲ႔လကၡဏာေတြျဖစ္တတ္ပါတယ္. ခါးနာတာတုိ႔ အေညာင္းမိတာတုိ႔အတြက္ ေနာက္ဆုံးေပၚ memory foam လု႔ိေခၚတဲ႔ ေခါင္းအုံးေလးေတြ၊ ေက်ာမွီေလးေတြနဲ႔ အဆင္ေျပေအာင္ ျပဳျပင္လုိ႔ရပါတယ္.


မ်က္စိေညာင္းတာ၊ မ်က္ရည္ပူက်တာေတြကုိ ကာကြယ္ဖုိ႔အတြက္ကေတာ႔ ကၽြန္ေတာ္တုိ႔ေတြ သိပ္ျပီး အာရုံစုိက္ေလ႔ မရွိတတ္ၾကပါဘူး. ကၽြန္ေတာ္ဒီေန႔ ေျပာခ်င္တာကေတာ႔ အဲဒီ႔ ျပႆနာပါပဲ.

မ်ားေသာအားျဖင္႔ မ်က္စိကုိ မထိခိုက္ေစခ်င္ရင္ ေမာ္နီတာေရွ႔မွာ Filter အျပားေလးခံလုိ႔ရပါတယ္. ဒါေပမယ္႔ အဲဒါက Desktop monitor အၾကီးၾကီးေတြ သုံးသူေတြအတြက္ပဲ အသုံး၀င္မွာပါ. Laptop ကြန္ျပဴတာေလးေတြ သုံးေနသူေတြအတြက္ကေတာ႔ ေမာ္နီတာေရွ႔မွာ Filter ျပားခံဖုိ႔ အဆင္မေျပႏုိင္ပါဘူး. ဒါေၾကာင္႔ အခု ကၽြန္ေတာ္ေပးမယ္႔ ေဆာ႔ဖ္၀ဲလ္ေလးကုိ အင္စေတာလ္လုပ္လုိက္ရင္ ဒီျပႆနာကုိ ေျဖရွင္းျပီးသားျဖစ္သြားမယ္႔အျပင္ ေရရွည္အတြက္လည္း အက်ိဳးမ်ားေစပါလိမ္႔မယ္.

နာမည္က F.lux ပါ. သူ႔ရဲ႔ အထူးျပဳအေၾကာင္းအရာကေတာ႔ ေမာ္နီတာေတြအတြက္ အလင္းေရာင္ကုိ အလိုအေလွ်ာက္ခ်ိန္ေပးတာပါပဲ.

ေန႔ခင္းမွာ ေန႔ခင္းအေလွ်ာက္၊ ညေနခင္း အလင္းေရာင္နည္းသြားခ်ိန္မွာ နည္းသြားတဲ႔အေလွ်ာက္၊ ညဥ္႔နက္သန္းေခါင္ သန္းလဲြအခ်ိန္မွာလည္း သူ႔အခ်ိန္အခါအေလွ်ာက္ ရွိသင္႔တဲ႔အလင္းေရာင္ပမာဏကုိ ခ်ိန္ေပးသြားတာပါ.

Download Links:
1. For XP/Vista/Windows 7 Users
2. For Mac OS X
3. For Linux Users


သုံးစဲြၾကည္႔လုိက္ပါ. ၾကိဳက္ရင္ဆက္သုံးပါ. မိတ္ေဆြသူငယ္ခ်င္းအေပါင္းအသင္းေတြကုိလည္း မွ်ေ၀ေပးလုိက္ပါ.

Credit to>>> http://mmbloggershelpdesk.blogspot.com/

Tuesday, January 21, 2014

Top 6 Alternatives to Torrific for Torrent Download

Miloshare that allows you to access a wide variety of torrents for all sorts of files including movies, videos, books, software etc. Most users find it beneficial especially if their computer has an ISP lock or other such restrictions. Also if you are using BitTorrent to torrent file, your identity and activity including downloads, are visible however using miloshare for downloads, All you have to do is upload the torrent to miloshare, wait for it to be cached and your download will be initiated.Your File whern uploaded .. you can access from anywhere..

ZbigZ

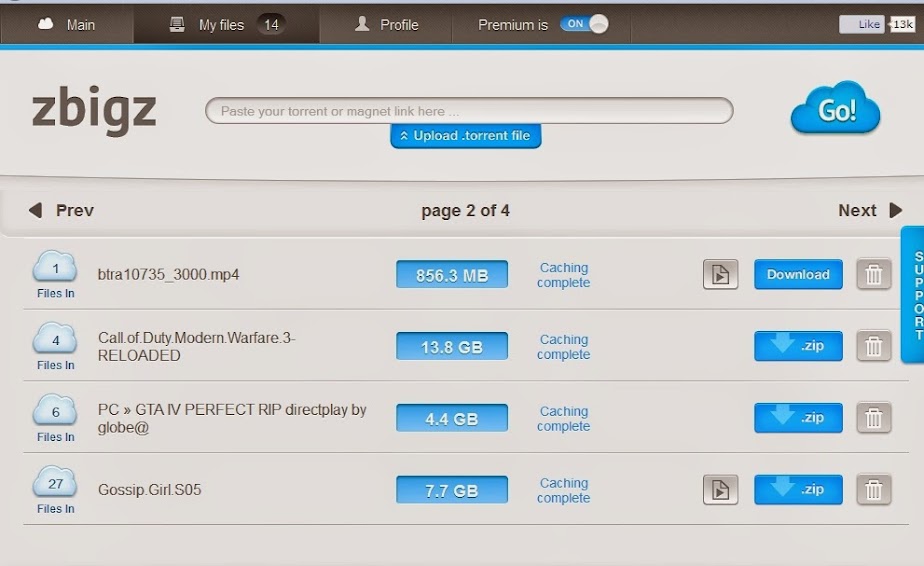
Next in line to Torrific is the ZbigZ that allows you to access a wide variety of torrents for all sorts of files including movies, videos, books, software etc. Most users find it beneficial especially if their computer has an ISP lock or other such restrictions. Also if you are using BitTorrent to torrent file, your identity and activity including downloads, are visible however using ZbigZ for downloads, you are hidden as ZBigZ does the work for you. All you have to do is upload the torrent to ZbigZ, wait for it to be cached and your download will be initiated.
Furk


Furk.net enables you to upload your files and leech them. You can then straight away download the file via direct link. Furk is particularly suitable for those who have slow internet issues but ones with faster services are also benefitted against throttling. All downloads are made using the HTTP ensuring higher speed and more user secrecy. On the downside, free users can download files of size 700 MB whereas only premium account holders are allowed unlimited downloads along with the freedom to use download managers.
PUT.io

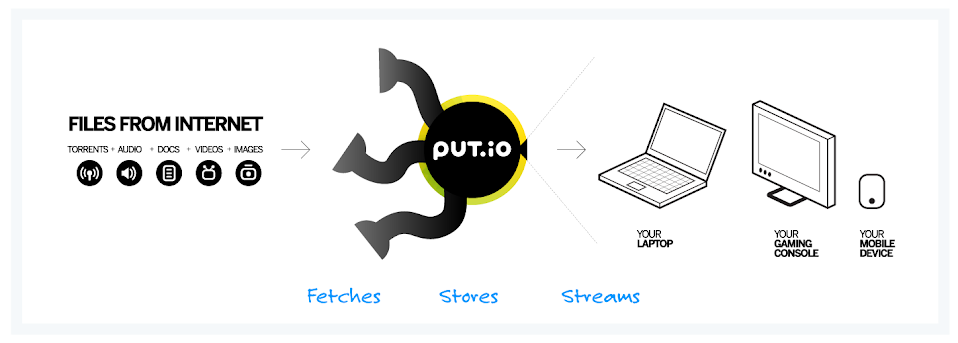
PUT.io emerged as online cloud storage that fetches the torrents even from BitTorrents and streams them on your private online 50GB storage. The service also automatically follows your RSS feeds and stores all videos, audios etc. From that feed. Optimum service usage is when you sync your movies.io account with PUT.io. You can use the service fully with a premium account. Once you have it, be ready to enjoy DivX movies without having to download them on your computer. Works well as a torrific alternative.
Torrenthandler

As an alternative to Torrific, the service comes after you have disliked the above mentioned ones. Using TorrentHandler is simple – after acquiring a .Torrent file, upload it by using Add Torrent on TorrentHandler account and wait for the service to email you instructions to download the file.
Boxopus

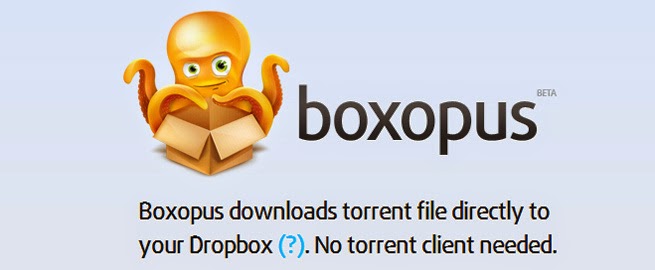
With Boxopus, you don’t need to use a torrent client at all for the service downloads themdirectly to Dropbox. Users can link Boxopus to their Dropbox folder using their credentials, all the files will be automatically connected to all computers with Dropbox service. You can still keep your anonymity while downloading files since Boxopus has covered that up.

Monday, January 13, 2014

Untether Jailbreak for iOS 6.1.3, 6.1.4, 6.1.5


"p0sixspwn" ႏွင့္ Jailbreak လုပ္ႏိုင္မည့္ iDevice မ်ား
iPhone 3Gs
iPhone 4
iPhone 5
iPodTuoch 4G
iPodTuoch 5G
iPad 2
iPad 3
iPad 4
iPad Mini (1st Gen)

>> Download p0sixspwn (Windows)
>> Download p0sixspwn (Mac)

Friday, January 10, 2014

Netviewer program

Supplement for Windows Media Player (H.264 file playback) Download here.

Network DVR4FW the preview program, DVR4RW, DVR8RW, DVR16RW 4, 8, 16-channel image recorders.


Network preview of the new program, VTC 9104, VTC 9108, VTC 9116-4, 8, 16-channel image recorders.Download Here


Letöltés itt.

CCTV VIEWER


Playback Ver 2.3.0.4
software playback of recorded data that was backed up (English only)
PlaybackSetup_2.3.0.4.Zip run download


1.2.7.227 Netviewer Ver
software perform Live display of the DVR, the display of the recorded data
Netviewer-Kguard_V1.2.7.227-MLANG.zip download execution


The AVIGenerator Ver-V1.9.0.0
software to convert to AVI format recording data that was backed up
AVIGenerator-V1.9.0.0.zip download execution


Product catalog of 4. KG-CA104-H02 (PDF) Download

About Benefits of Kgurad Inc. 5. Smacam.com and (PPT) Download

Manual setting of 6. DDNS (PDF) Download

7. Windows-only viewer (Kview Center) Download English manual download

  to start automatically when you start the PC shortcut is set to start-up after installation.
  In the case of Windows7, Start menu - a> KViewCenter -> Startup -> All Programs
  will not start on PC startup if you delete.

8. MAC-only viewer (KView for Mac) Download

Downloading Video From Your Bunker Hill DVR

A very popular DVR with the paranormal hobbiest is the Bunker Hill Security 68332system (Harbor Freight). It is relatively inexpensive, widely sold, and is pretty much ready to go out of the box.
BUT...The company made a bit of a mistake recently. They "upgraded" the operating system without upgrading the software and instruction booklet that come with the unit. This means that while recording video on the system is super-idiot-easy (except for fixing the time stamp apparently - I messed that up twice), downloading the video from the unit to your computer takes a bit of research at the very least. A little knowledge of browser settings and how networks function doesn't hurt.
I have come to your rescue.
These instructions, if followed closely, should allow you to download your video files from the DVR unit to your computer's hard drive.
Let's start with the basics. You will need a Windows computer (I don't know if the system is Mac compatible or not) and access to open ports on your home network router or switch. Your computer should be HARD-WIRED to the network. I have had zero luck getting this to work on my laptop over a wireless connection. I will update the article if and when I figure that part out. Of course your DVR will need to be plugged into the network also.

Access the DVR normally via its video interface. Yes, you will need a television or laptop with video inputs to do this. From the main menu screen select the NETWORK option.


On that screen you will find an entry for your DVR's IP address (something like 192.168.001.149). WRITE DOWN THIS NUMBER.

Now we must prepare your computer to accept data from the DVR. In Internet Explorer (I haven't tinkered with the protocol for other browsers) select INTERNET OPTIONS from your TOOLS menu.


On the next menu, click on TRUSTED SITES and then click on the SITES button.


On the next menu, uncheck the dialog box that says "requires server verification". Now enter the IP address preceded with "http://" as shown below.


Close that menu, and on your way out reset the TRUSTED ZONE security level to LOW.


Your browser should be able to access the DVR's WEB APPLICATION MANAGER now. Just type in the IP address of your DVR into the address bar and the login screen should appear. You may get sometype of download warning from your browser, firewall, or antivirus software. Gently reassure your computer that everything is fine and continue.


The default login information should be blank. Just click LOGIN and continue.

Next you will want to select the REPLAY tab. On that screen you will be able to use the calendar on the right to navigate to your stored files.


Note that this calendar relies on your computer's calendar date and, if...like me...your DVR system date was wrong when you recorded them, you might have to click around a bit. Regardless, dates with data will be highlighted in BOLD print.


Selecting an active date will give you a file list. Using the drop down menus and search button can help you find the file you are looking for.


Once you have selected the file you want, you will be able to play it. For our purposes you will also be able to download it to your computer. This is done by selecting the BACKUP BUTTON.


Your file will download to your hard drive to a folder named "dvr". Unfortunately, it will download in .264 format which is essentially useless. Next you will need to convert that file to .avi format. This is accomplished by clicking on the 264 TO AVI button after it has downloaded.


A little box will pop up asking you to select your source and destination files. Navigate the source to the files stored on your c: drive. Navigate the destination to wherever you want the video file stored and give it a name that makes sense.


About the only problem you might encounter after this point is that your video viewing and editing software may be missing the necessary codecs to work with the new file. If that is the case you may need to convert the file yet once again to a more friendly format. The software I use for this is WinFX Free Video Convertor. It installs with some useless adware that you can uninstall, but works great for many types of video conversions.

hack-unifi-default-password


There’s a lot of documentation online on how to hack your neighbours Wi-Fi, but sometimes you need to hack your own system. Usually its because you’ve change your router password and forgot it completely, leaving you in the cold desolate place we like to call “No router land”.


Don’t fear though, its actually pretty darn easy to hack your standard Dlink Dir-615 router (pictured above) that came stock with your Unifi subscription. Make no mistake, the router actually has some pretty sleek features, but Telekom Malaysia has a lackadaisical approach to security that makes hacking this router merely google searches away.


The default Unifi access credentials are:


Username : admin

Password :


Where the password field is literally left blank, (as it is).


However, if you’re locked out of your Unifi router, here’s a couple of things you could do to get your connection back:


Most of the time, I recommend you use the admin account to change your Unifi settings, TM themselves admit that they don’t even set a password for this account on their user guide (page 9, 2nd bullet). However, if you’ve changed the password to this account and forgot it, there’s still a 2nd account that is left lurking in the system.


This is the ‘Operator’ account, and actually has more features than the standard ‘Admin’ account. TM have left this here, presumably for support purposes, but quite frankly, they shouldn’t. It’s like your house contractor, keeping a spare key to your home for ‘support’ purposes, it’s just not good security.


Fortunately though, if you’ve just changed the ‘Admin’ password, you’ve still got a chance to go back into your router and set things up correctly, just logon with the Operator account using one of the following credentials:


Username: Management

Password: TestingR2


Username : operator

Password : h566UniFi


Username : operator

Password : telekom


Username : operator

Password : <your Unifi username in reverse order>


Needless to say, please change the operator password once you’ve logged on, and remember it wisely this time.


This options isn’t as hard as it might seem. For those running a router with a firmware version of 7.09 and below, there is a well documented vulnerability on the Dlink Dir-615 router that enables you to access your router without even knowing the username or password. To do so, just enter the url below;


http://192.168.0.1/tools_admin.php?NO_NEED_AUTH=1&AUTH_GROUP=0


For more info on the vulnerability check out this link here. The vulnerability is called an authentication bypass, and literally allows you to access the router with no credentials at all! You can visit any page from the router menu, by just adding the “?NO_NEED_AUTH=1&AUTH_GROUP=0″ to the end of the link.


*Edited 5-Dec-2013*


I’m really scared of this one. As from my checks with a couple of Shodan searches ALL Unifi routers are susceptible to this attack. All you need to do this is visit this link:


http://192.168.0.1/model/__show_info.php?REQUIRE_FILE=/var/etc/httpasswd


And you’ll see in plain-freaking-text, your unifi routers username and password, for both the admin and operator/management accounts.


Thanks to use_the_source_luke from this bugtraq post.


This is all public information at this point and you deserve to know that your unifi router is insecure. So get out there and buy a new router already.


*end edit*


There are other vulnerabilities on the Dlink router, including the famous config.bin password hack, however, from my checks, most Unifi routers are already patched with the fix for that. Leaving the above two options your only hope. If you really are out of options, you can always purchase a new router for your Unifi connection (I recommend the Asus RT-N12C1 or the Asus RT-N12HP)


However, you made need to call TM for your Unifi Password.


It’s also important to learn how to secure your router, the first bit is easy. Change the passwords, TM have a really bad habit of setting the router password to blank, meaning there literally is NO PASSWORD!!


Needless to say, that’s bad security. What’s even worse is the average customer isn’t aware of the operator account which is left on the system with default passwords as well. From my quick checks, about 50% of people don’t change they’re router Admin passwords, and nearly 99% of people haven’t changed their operator password. You can’t really blame them, they didn’t know the operator account was there in the first place. So basically 99 times out of a 100, you’ll be able to ‘hack’ your unifi router using nothing but default passwords.


Securing the router, first and foremost requires that you change the passwords from their default values.


Secondly, if you’re using a firmware version of 7.09 and below, it’s time to upgrade your firmware. Upgrading your router firmware is actually pretty common stuff, there are entire websites that are dedicated to documenting router vulnerabilities, not for hackers, but security research–and this concept actually helps make our everyday appliances more secure.


A lot of people have locked themselves out of their home routers, so hopefully this post helps. However, because TM have such a bad stance against security, it also means that if you don’t take the necessary precautions, you could be on the wrong end of an attack.


Remember to stay safe and secure, securing your router is as important as securing your front door.

Thursday, January 9, 2014

facebook ေနာက္ခံ theme ေလးေတြေျပာင္းမယ္...

က်ေနာ္တို႕ facebook မွာေနာက္ခံbackgroundေလးေတြေျပာင္းမယ္ေနာ္...

(၁) ပထမဦးဆံုးအေနနဲ႔ STYLISH သြင္းလိုက္ပါ...MOZILA အတြက္ ဒီမွာ CHROME သုံးရင္ ဒီမွာ
(၂) ဒုတိယအေနနဲ႔ facebook၀င္လိုက္ပါ..
(၂) တတိယမွာေတာ့ facebook theme ေတြကိုသြားယူပါ..
(၄) စတၳဳထအေနကေတာ့ အဲဒီေနရာမွာ facebook theme ေလးေတြေျပာင္းဖို႕အတြက္လင့္ေလးေတြရွိပါတယ္ လင့္ေလးေတြကိုႏွိပ္ျပီးၾကိဳက္ရာ ေနာက္ခံဘတ္ကေတာင္းကိုေျပာင္းနိုင္ပါတယ္ခင္ဗ်ာ..


ဒီလိုေလးေတြေလဟီးးးးး

iOS 7+ အတြက္ ျမန္မာစာ ႏွင့္ ျမန္မာကီးဘုတ္ မွန္ကန္စြာ သြင္းယူနည္း

iOS 7 အတြက္ Jailbreak ထြက္ၿပီးခဲ့ေသာ္လည္း ျမန္မာစာႏွင့္ လက္ကြက္ကို ခ်က္ျခင္း သြင္းမရခဲ့လို႔ Jailbreak ရဲ႕ အႏွစ္အရသာကို အျပည့္အဝ မခံစားခဲ့ၾကရသလို ျဖစ္ခဲ့ပါတယ္။ 
ျမန္မာစာႏွင့္ လက္ကြက္ကို လိုခ်င္ေဇာျဖင့္ Font ႏွင့္ Keyboard အေဟာင္းေတြကို သြင္းမိတဲ့အတြက္ iOS "Crash" ျဖစ္ၿပီး Restore အခါခါ ျပန္လုပ္ခဲ့ၾကရသူေတြလည္း မနည္းပါဘူး။ 
ယခုေတာ့ အဆိုပါ အခက္အခဲမ်ားကို ေျပလည္ေစႏိုင္ဖို႔ အတြက္ ျမန္မာ Developers မ်ားက ဝိုင္းဝန္း၍ iOS 7+ ႏွင့္ အဆင္ေျပေစမယ့္ ျမန္မာစာႏွင့္ လက္ကြက္ကို ထုတ္ေဝေပးလိုက္ပါၿပီ... 


iOS 7+ အတြက္ ျမန္မာစာႏွင့္ လက္ကြက္ကို Developer မ်ားျဖစ္ၾကေသာ ကိုသန္႔သက္ခင္ေဇာ္၊ ကိုေစတန္ ႏွင့္ ကိုမိုးစက္တို႔က သီးျခားစီ develope လုပ္ေပးထားၾကပါတယ္။
ဒီအတြက္ သံုးစြဲသူမ်ားအေနႏွင့္ ဘာကို Install လုပ္ရမွန္းမသိပဲ အနည္းငယ္ ႐ႈပ္ေထြးေစႏိုင္ပါတယ္။ အကယ္၍ မွားယြင္းစြာ Install လုပ္မိပါက iOS Crash ျဖစ္ျခင္း၊ Boot Looping ျဖစ္ၿပီး Apple Logo ကေန မတက္လာေတာ့တဲ့ အေျခအေနမ်ား ျဖစ္တတ္ပါတယ္။
လိုအပ္ခ်က္မ်ား

iDevice သည္ iOS 7+ Jailbreak ျဖစ္ထားရန္
Cydia ကို version Update လုပ္ထားရန္

မွတ္ခ်က္

အစကနဦး iOS 7 အတြက္ ေဖာင့္မရေသးခင္က ေဖာင့္အေဟာင္း "Zawgyi Font iOS" ကို သြင္းထားမိခဲ့ပါက အရင္ဆံုး "Remove" လုပ္ပါ။
"ZawgyiOne-Font" profile ကို install လုပ္ထားျခင္းက ျပႆနာမရွိပါ။ (မႀကိဳက္လွ်င္ Remove လုပ္ႏိုင္ပါသည္)
iDevice မ်ားတြင္ ျမန္မာစာႏွင့္ လက္ကြက္ ေကာင္းမြန္စြာ အလုပ္လုပ္ႏိုင္ရန္ ေအာက္ေဖာ္ျပပါ အဆင့္မ်ားအတိုင္း လုပ္ေဆာင္ပါ။
ျမန္မာစာႏွင့္ လက္ကြက္ အတြက္ Source ႏွစ္ခုကို သြင္းယူရမွာျဖစ္ပါတယ္။


လုပ္ငန္းစဥ္

ျမန္မာစာ အတြက္ Install Source (1)


Cydia -> Sources -> Edit -> Add တြင္ " http://cydia.macforus.com " ကို သြင္းယူပါ။
Sources ထဲက "Mac For US repo" ရွိ "Zawgyi iOS 7 Font" ကို Install လုပ္ပါ။


ျမန္မာလက္ကြက္ အတြက္ Install Source (2)

Cydia -> Sources -> Edit -> Add တြင္ " http://ttkz.me/apt/ " ကို သြင္းယူပါ။
Sources ထဲက "ttkz.me" ရွိ "ttKeyboard for iOS7 (Beta)" ကို Install လုပ္ပါ။

Restart Springboard

Myanmar Keyboard ကို သြင္းၿပီးသြားေသာအခါ Settings -> General -> Keyboard -> Keyboards မွာ "Burmese" လို႔ အလိုလို ေရာက္လာပါမည္။ (ကီးဘုတ္ရပါၿပီ)

မွတ္ခ်က္။ ။ အျခားေသာ Keyboard ႏွင့္ Font မ်ားကို မသြင္းမိေအာင္ သတိျပဳပါ၊ အထူးသျဖင့္ "Zawgyi iOS 4.3 Font" သည္ 100% Crash ျဖစ္ေစပါသည္။

ေဖာ္ျပပါ ျမန္မာစာႏွင့္ လက္ကြက္ Install လုပ္နည္းသည္ ကိုယ္တိုင္ စမ္းသပ္စဥ္ Crash ျဖစ္၍ Restore အႀကိမ္ႀကိမ္ ျပန္လုပ္ၿပီးမွ သိရွိထားေသာေၾကာင့္ အဆင္ေျပ အေခ်ာေမြ႕ဆံုး နည္းလမ္း ျဖစ္သည္ဟု သတင္းေကာင္းပါးအပ္ပါသည္။

**Apple log မွာ တစ္ေနျခင္း (Boot Loop) ျဖစ္ေနခဲ့ေသာ္**


Device ကို PC ႏွင့္ မခ်ိပ္ဆက္ပဲ DFU mode ဝင္ပါ။
DFU mode ေရာက္သြားပါက iTunes ႏွင့္ ခ်ိပ္ဆက္ပါ၊ Restore လုပ္ရန္ ညႊန္ၾကားလာပါလိမ့္မည္။

iOS, App မ်ား Crash ျဖစ္ခဲ့ေသာ္ iTunes ႏွင့္ ခ်ိပ္ဆက္ၿပီး Restore ျပန္လုပ္ၿပီးမွ Jailbreak တစ္ခါ ျပန္လုပ္ပါ။

အခမဲ့ဆိုတဲ့ အရာတိုင္းမွာ ခန္ ့မွန္းလို ့ မရႏိုင္တဲ့ တန္ဖိုးတစ္ခုေတာ့ အၿမဲရွိေနပါတယ္....

ဤေဆာင္းပါးေလးကေန သင့္အတြက္ တစ္ခုခု ရလိုက္တယ္ဆိုရင္ ေအာက္မွာ "Like & Share" လုပ္ႏိုင္ပါတယ္

credit to>>>> မိုးသိၾကား  -http://www.moethagyar.info

Wednesday, January 8, 2014

Recover UniFi PPPoE Password


Bought myself a replacement router for UniFi, here comes the problem. Where do I fond my unifi PPPoE login password?

Below a quick guide which I found after Google it.
First you need to enable Telnet if you are using the Windows 7.
  1. Control Panel  -> Programs And Features –> Turn Windows features on or off
  2. Check Telnet Client
  3. Click OK
Next Telnet into the D-Link Router supplies by TM. If you don’t have the Super Admin (aka operator) password try followings.
Username : operator
Password : telekom
Username : operator
Password : h566UniFi
Username : operator
Password : <your Unifi username in reverse order>
BTW for those who don’t know how to use Telnet. Open a Command Prompt windows. Type Telnet 192.168.1.1 (the D-Link router IP). Once successful your will be prompt to enter user id and password.
Enter this command once you login.
cat /etc/ppp/chap-secrets
Source:
http://unifi.athena.my/router_security.php

Unifi DIR-615 upgrade firmware 7.09 to 7.15 improve stability

Unifi DIR-615 upgrade firmware 7.09 to 7.15 improve stability


This update only applies for malaysian unifi users, its a very critical update because the 7.09 firmware is very unstable, many bugs and you cant port forward properly with it. So it's reccomended for users to update if your using still with 7.09
You will need to check if your modem is currently using the old firmware which is 7.09(firmware such as 7.11,7.12..etc have different operator passwords, so google for it)
If its someother version number, DO NOT proceed
go here http://192.168.0.1/index.php
modem update 1.jpg (59.12 KiB) Viewed 686 times

If your firmware version is 7.09, than you may proceed with this guide, if its something else. I repeat DO NOT PROCEED

1st, LOGIN at http://192.168.0.1/index.php

username: operator
password: h566UniFi

2nd. Once you have successfully log in, be aware that the 7.09 firmware is quite unstable so the page would not load up so fast.
Than on the menu, click on maintenance, than click on firmware update. You will now see this page.


3rd. Download this
http://www.mediafire.com/?3wwh5zskt2zgwdk
extract it somewhere and upload it to your router, press choose file


4th. Upload the firmware update to your router


5th. The firmware is now updating, now this is very important.
Do not power down the device or your router will be bricked
So just wait patiently for 2 minutes.


6th. Once the update is completed, your firmware version will now be 7.15
enjoy better stability and no problems with port forwading


OLD VERSION


if ur router version 7.09
id: operator
pass: h566UniFi

if ur router version 7.14
id: Management
pass: TestingR2
INFO
for L7 Network N-R2000 WiFi coverage low and slow try read this guide LINK

Sunday, January 5, 2014

How To Block AdBlocker on Your Blogger Blogspot?


Advertisement annoys each and every visitor especially the pop up ads. This is the reason why lots of internet addicts recommend AdBlock, which brings fruitful experience to users but for Bloggers it’s the biggest pain in their brain. When a user blocks ads with the help of Ad Blocking Software It takes away lots of earning opportunities from a blogger and hence, they notice a significant decrease in their earnings. You have seen lots of WordPress Plugins created to block unwanted advertisement, but blogger lacks in optimizing. Therefore, in blogger we don’t have identical scripts like WordPress but what we have is, worth considering. This script will keep on sending notifications to your visitors until they disable AdBlock so today we will discuss How to Block AdBlock on Blogger BlogSpot Blog?
How AdBlock Could Damage Bloggers:

Ad Blocker not only hurts a blogger mentally but also damages his online earning possibilities. Earning is not everything, but to run an organization we need money so if there would be no earning then the probabilities are extremely high that a blog might face the tragic ending, and as a result users would lose their vital source of learning.

Readers moreover loyal readers need to realize, that a man who is responsible for running such an enormous organization, who is keeping everything together in a systematic manner need some sort of token money. It doesn’t matter whether the money is large or small, but it does increases thirst in a blogger to blog more effectively.

How To Detect Your Visitors Are Using AdBlock:

This is the toughest part of this whole process, with the help of some scripts we can easily detect their browsers, operating system and even their IP Addresses but its extremely difficult to identify whether they are using it or not. Here we need to compare our Blog’s daily visitors and earning statistics, if the earning ratio is extremely low in comparison with visitors then sure-enough your visitors are bluffing you with ad blocker.

How To Get Rid Of AdBlock From BlogSpot Blogs:

There are two different methods which could be utilized to realize our visitors to disable ad blocker while surfing your website.

Ask Your Readers to Disable AdBlock:

Make conversations with your reader on your blog or schedule a hangout with them, and make them realize that the community is declining due to lack of sponsors, while some sponsors are not satisfied because visitors are using ad blocking scripts. It has almost cut downed blog’s earning into two pieces. Ask for help, and tell them to disable their Ad Blocker while browsing your blog.

Force them to stop using AdBlock:

To force your visitors to disable AdBlocker we will use a Script which will detect AdBlock and guide the user to disable if they want to continue, otherwise it will keep on sending annoying notifications to until or unless they disable AdBlock so to do so.

Go to Blogger >> Template >>
Back up your template incase any thing went wrong.
Now select Edit HTML >> Proceed.
Then search for ]]></b:skin> and once you find it, just above it paste the following CSS code.


#mbl_noadblocker {
display:none;
}
Now search for </head> and just above it paste the following JavaScript Code.


<script type="text/javascript">
if (document.getElementById("mbl_noadblocker") != undefined)
{
}
else
{
alert("We've detected that you're using AdBlock Plus or some other adblocking software. In order to keep this website free, this site is sponsored in part by advertisements.\r\nPlease consider disabling your ad blocker on this website\r\nif you enjoyed the content, and would like to support future \r\ninformative posts.Thank you!\r\n\r\nClick OK to continue\r\n\r\nPowered by mybloggerlab.com...");

setTimeout("nag()",12000);
}
</script>
Now Search for <body> and just below it paste the following code.


<script type="text/javascript" src="http://ftp.bauer-power.net/misc/tc/advertisement.js"></script>


All done Save your Template by pressing Save Now button.
Now any visitors who will visit you blog with AdBlock enable will face an annoying message, he will continue to get this message until he disables AdBlock. Here is the example of that message

So, guys we hope now you are stress free and can easily wipe out those who are bluffing you with AdBlock. If you need any help feel free to ask till then, peace, blessing and Happy NO Ads Blocking.
credit>> http://www.mybloggerlab.com