


Monday, February 17, 2014
Network Monitor Mini Pro For Android

ကိုယ္အင္တာနက္ ဆြဲယူအသံုးၿပဳေနအား တင္ေနအားကို ေဖာ္ၿပေပးတဲ့ Network Monitor Mini Pro အလန္းေလးပါ ။
ပံုတြင္ၿပထားသလို ၿမန္မာလိုစာသားကေတာ့ သူ႔စက္တင္ထဲမွာ မိမိၾကိဳက္ရာေရးသား ေဖာ္ၿပႏိူင္ပါတယ္ ။
စာလံုးဆိုဒ္အေနအထားနဲ႕ စခရင္မွာေဖာ္ၿပမည့္ေနရာကိုလဲ ၾကိဳက္ရာေနရာ လိုသလိုထားႏိူင္ပါတယ္ ။
စာလံုး Font Style ဒီဇိုင္းမ်ားကိုလဲ မိမိၾကိဳက္ရာ ဒီဇိုင္းေရြးခ်ယ္ထားႏိူင္ပါတယ္ ။
တၿခားစက္တင္ပိုင္း အစံုပါရွိပါတယ္ ။
မိမိၾကိဳက္ရာ ေရးသားေဖာ္ခ်င္သူမ်ားကေတာ့ Readings အပိုင္းရဲ႕ Custom Prefix က Set ေလးကို ႏွိပ္လိုက္ပါ ။ ၾကိဳက္ရာေရးသားေဖာ္ၿပဖို႕ ရိုက္ထည့္ရန္ေပၚလာပါမယ္ ။
လိုခ်င္သူမ်ား ေအာက္မွာေဒါင္းယူပါ မားကပ္မွာ $ 1.00 က်ပ္တန္ ေဆာ့ဝဲၿဖစ္ပါတယ္ ။
Network Monitor Mini Pro V1.0.85 ေဆာ့ဝဲကို လိုခ်င္သူမ်ား Dev Host လင့္ၿဖင့္ ဒီမွာေဒါင္းယူပါ ဆိုဒ္က 304 KB ေလးပဲရွိပါတယ္ ။
Network Monitor Mini Pro V1.0.85 ေဆာ့ဝဲကို လိုခ်င္သူမ်ား Zippyshare လင့္ၿဖင့္ ဒီမွာေဒါင္းယူပါ ဆိုဒ္က 304 KB ေလးပဲရွိပါတယ္ ။
Network Monitor Mini Pro V1.0.85 ေဆာ့ဝဲကို လိုခ်င္သူမ်ား Limelinx လင့္ၿဖင့္ ဒီမွာေဒါင္းယူပါ ဆိုဒ္က 304 KB ေလးပဲရွိပါတယ္ ။
Network Monitor Mini Pro V1.0.85 ေဆာ့ဝဲကို လိုခ်င္သူမ်ား FilePup လင့္ၿဖင့္ ဒီမွာေဒါင္းယူပါ ဆိုဒ္က 304 KB ေလးပဲရွိပါတယ္ ။
Credit>>> Djjoe Man (MMF)
Fepfz For Android 4.x.x အထက္ ၿမန္မာစာမွန္ေစတဲ့ Apk
Android 4.x.x အထက္ ၿမန္မာစာမွန္ေစတဲ့ Apk ေလး ထြက္ရွိလို႕ လာပါၿပီ
ၿမန္မာစာရွိၿပီး စာေတြမမွန္ဘူးဆိုပါက ထို Apk ေလးကို အင္စေတာလုပ္ေပးလိုက္ပါ 100% ၿမန္မာစာမွန္သြားတာကို သင္ေတြ႔ရပါမယ္ ။
ထို Fepfz . apk ဆိုတဲ့ေဆာ့ဝဲကို အသံုးၿပဳႏိူင္ဖို႕ရန္ မိမိဖုန္းမွာ Root ရွိထားဖို႕ လိုအပ္ပါတယ္ ။
( မွတ္ခ်က္ ။ ။ ထိုေဆာ့ဝဲသည္ ၿမန္မာစာထည့္ေပးခ်င္းမဟုတ္ပါ ၿမန္မာစာမွန္ကန္ေအာင္လုပ္ေပးၿခင္း သက္သက္သာၿဖစ္ပါတယ္ ။
ထိုေၾကာင့္ၿမန္မာေဖာင့္ရွိၿပီး ၿမန္မာစာလြဲေနေသာ ဖုန္းမ်ားအတြက္သာ...... )
အကုန္ၿပည့္စံုၿပီး လုပ္ေဆာင္ခ်က္လဲမွန္ၿပီး
PATCH_FAIL_ERROR ျဖစ္ၿပီးမရခဲ့ပါက code segment မကိုက္လို႔ပါ။
အဲဒီဖုန္းေတြအတြက္ /system/lib/libharfbuzz.so ဆိုတဲ့ file ေလးကို dr.kyawzawnaing@gmail.com သို႕ ပို႔ေပးထားပါ။
သတ္မွတ္ထားတဲ့ Emailဆီသို႕ ဖုန္းေမာ္ဒယ္ ဗားရွင္းနဲ႕တကြ မွန္ကန္စြာၿဖည့္စြတ္ၿပီး ပို႕ေပးပါ ။
ေနာက္ပိုင္း အဲဒီ code segment လည္း ျပင္လို႔ရေအာင္ ေနာက္ထြက္လာမယ့္ Update မွာ ထိုဖုန္းမ်ားအတြက္ ၿဖည့္စြတ္ေရးသားေပးပါလိမ့္မယ္ ။
ၾကန္႔ၾကာေနခဲ့ရင္လည္း သည္းခံေပးပါ။
+01.jpg)
+02.jpg)
"" Update အသစ္ထြက္လာတိုင္း ေအာက္မွာအစဥ္လိုက္ တင္ေပးသြားပါမယ္ ""
ဗားရွင္းအေဟာင္းမွာ မရေသာဖုန္းမ်ားအတြက္ Update အသစ္ထြက္လာတိုင္း ထိုဖုန္းမ်ားအတြက္ ပံ့ပိုးေပးသြားတာၿဖစ္ပါတယ္
အရင္ Version 2 နဲ႔ Patch လုပ္ထားတဲ့သူေတြ Unpatch ျပန္လုပ္ဖို႔ လိုပါလိမ့္မယ္။
ၿပီးမွ ျပန္ၿပီး Patch လုပ္ရပါမယ္
@@@@@@@@@@@@@@@@@@@@@@@@@@
Fepfz V1.0
Fepfz V1.0 ေဆာ့ဝဲကို လိုခ်င္သူမ်ား Dev-Host လင့္ၿဖင့္ ဒီမွာေဒါင္းယူပါ ဆိုဒ္က 276 KB နည္းနည္းေလးပဲရွိပါတယ္ ။
Fepfz V1.0 ေဆာ့ဝဲကို လိုခ်င္သူမ်ား Limelinx လင့္ၿဖင့္ ဒီမွာေဒါင္းယူပါ ဆိုဒ္က 276 KB နည္းနည္းေလးပဲရွိပါတယ္ ။
Fepfz V1.0 ေဆာ့ဝဲကို လိုခ်င္သူမ်ား Zippyshare လင့္ၿဖင့္ ဒီမွာေဒါင္းယူပါ ဆိုဒ္က 276 KB နည္းနည္းေလးပဲရွိပါတယ္ ။
Fepfz V1.0 ေဆာ့ဝဲကို လိုခ်င္သူမ်ား pCloud လင့္ၿဖင့္ ဒီမွာေဒါင္းယူပါ ဆိုဒ္က 276 KB နည္းနည္းေလးပဲရွိပါတယ္ ။
@@@@@@@@@@@@@@@@@@@@@@
Fepfz V1.3
Fepfz V1.3 ေဆာ့ဝဲကို လိုခ်င္သူမ်ား Dev-Host လင့္ၿဖင့္ ဒီမွာေဒါင္းယူပါ ဆိုဒ္က 276 KB နည္းနည္းေလးပဲရွိပါတယ္ ။
Fepfz V1.3 ေဆာ့ဝဲကို လိုခ်င္သူမ်ား Limelinx လင့္ၿဖင့္ ဒီမွာေဒါင္းယူပါ ဆိုဒ္က 276 KB နည္းနည္းေလးပဲရွိပါတယ္ ။
Fepfz V1.3 ေဆာ့ဝဲကို လိုခ်င္သူမ်ား Zippyshare လင့္ၿဖင့္ ဒီမွာေဒါင္းယူပါ ဆိုဒ္က 276 KB နည္းနည္းေလးပဲရွိပါတယ္ ။
Fepfz V1.3 ေဆာ့ဝဲကို လိုခ်င္သူမ်ား pCloud လင့္ၿဖင့္ ဒီမွာေဒါင္းယူပါ ဆိုဒ္က 276 KB နည္းနည္းေလးပဲရွိပါတယ္ ။
@@@@@@@@@@@@@@@@@@@@@@@@
Fepfz V2.0
Fepfz V2.0 ေဆာ့ဝဲကို လိုခ်င္သူမ်ား Dev-Host လင့္ၿဖင့္ ဒီမွာေဒါင္းယူပါ ဆိုဒ္က 276 KB နည္းနည္းေလးပဲရွိပါတယ္ ။
Fepfz V2.0 ေဆာ့ဝဲကို လိုခ်င္သူမ်ား Limelinx လင့္ၿဖင့္ ဒီမွာေဒါင္းယူပါ ဆိုဒ္က 276 KB နည္းနည္းေလးပဲရွိပါတယ္ ။
Fepfz V2.0 ေဆာ့ဝဲကို လိုခ်င္သူမ်ား Zippyshare လင့္ၿဖင့္ ဒီမွာေဒါင္းယူပါ ဆိုဒ္က 276 KB နည္းနည္းေလးပဲရွိပါတယ္ ။
Fepfz V2.0 ေဆာ့ဝဲကို လိုခ်င္သူမ်ား pCloud လင့္ၿဖင့္ ဒီမွာေဒါင္းယူပါ ဆိုဒ္က 276 KB နည္းနည္းေလးပဲရွိပါတယ္ ။
@@@@@@@@@@@@@@@@@@@@@@@@
Fepfz V2.1
Fepfz V2.1 ေဆာ့ဝဲကို လိုခ်င္သူမ်ား Dev-Host လင့္ၿဖင့္ ဒီမွာေဒါင္းယူပါ ဆိုဒ္က 276 KB နည္းနည္းေလးပဲရွိပါတယ္ ။
Fepfz V2.1 ေဆာ့ဝဲကို လိုခ်င္သူမ်ား Limelinx လင့္ၿဖင့္ ဒီမွာေဒါင္းယူပါ ဆိုဒ္က 276 KB နည္းနည္းေလးပဲရွိပါတယ္ ။
Fepfz V2.1 ေဆာ့ဝဲကို လိုခ်င္သူမ်ား Zippyshare လင့္ၿဖင့္ ဒီမွာေဒါင္းယူပါ ဆိုဒ္က 276 KB နည္းနည္းေလးပဲရွိပါတယ္ ။
Fepfz V2.1 ေဆာ့ဝဲကို လိုခ်င္သူမ်ား pCloud လင့္ၿဖင့္ ဒီမွာေဒါင္းယူပါ ဆိုဒ္က 276 KB နည္းနည္းေလးပဲရွိပါတယ္ ။
@@@@@@@@@@@@@@@@@@@@@
ဆိုေဆာ့ဝဲကို ေရးသားသူကေတာ့ Developer By : Dr.Kyaw Zaw Naing ၿဖစ္ပါတယ္ ။
မူရင္း Page ဆိုက္ၿဖစ္တဲ့ https://www.facebook.com/fepfz ကိုဝင္ေရာက္ၿပီး Like လုပ္ေပးၿခင္းၿဖင့္ ဂုဏ္ၿပဳသြားၾကပါဦး :)
ၿမန္မာစာရွိၿပီး စာေတြမမွန္ဘူးဆိုပါက ထို Apk ေလးကို အင္စေတာလုပ္ေပးလိုက္ပါ 100% ၿမန္မာစာမွန္သြားတာကို သင္ေတြ႔ရပါမယ္ ။
ထို Fepfz . apk ဆိုတဲ့ေဆာ့ဝဲကို အသံုးၿပဳႏိူင္ဖို႕ရန္ မိမိဖုန္းမွာ Root ရွိထားဖို႕ လိုအပ္ပါတယ္ ။
( မွတ္ခ်က္ ။ ။ ထိုေဆာ့ဝဲသည္ ၿမန္မာစာထည့္ေပးခ်င္းမဟုတ္ပါ ၿမန္မာစာမွန္ကန္ေအာင္လုပ္ေပးၿခင္း သက္သက္သာၿဖစ္ပါတယ္ ။
ထိုေၾကာင့္ၿမန္မာေဖာင့္ရွိၿပီး ၿမန္မာစာလြဲေနေသာ ဖုန္းမ်ားအတြက္သာ...... )
အကုန္ၿပည့္စံုၿပီး လုပ္ေဆာင္ခ်က္လဲမွန္ၿပီး
PATCH_FAIL_ERROR ျဖစ္ၿပီးမရခဲ့ပါက code segment မကိုက္လို႔ပါ။
အဲဒီဖုန္းေတြအတြက္ /system/lib/libharfbuzz.so ဆိုတဲ့ file ေလးကို dr.kyawzawnaing@gmail.com သို႕ ပို႔ေပးထားပါ။
သတ္မွတ္ထားတဲ့ Emailဆီသို႕ ဖုန္းေမာ္ဒယ္ ဗားရွင္းနဲ႕တကြ မွန္ကန္စြာၿဖည့္စြတ္ၿပီး ပို႕ေပးပါ ။
ေနာက္ပိုင္း အဲဒီ code segment လည္း ျပင္လို႔ရေအာင္ ေနာက္ထြက္လာမယ့္ Update မွာ ထိုဖုန္းမ်ားအတြက္ ၿဖည့္စြတ္ေရးသားေပးပါလိမ့္မယ္ ။
ၾကန္႔ၾကာေနခဲ့ရင္လည္း သည္းခံေပးပါ။
+01.jpg)
+02.jpg)
"" Update အသစ္ထြက္လာတိုင္း ေအာက္မွာအစဥ္လိုက္ တင္ေပးသြားပါမယ္ ""
ဗားရွင္းအေဟာင္းမွာ မရေသာဖုန္းမ်ားအတြက္ Update အသစ္ထြက္လာတိုင္း ထိုဖုန္းမ်ားအတြက္ ပံ့ပိုးေပးသြားတာၿဖစ္ပါတယ္
အရင္ Version 2 နဲ႔ Patch လုပ္ထားတဲ့သူေတြ Unpatch ျပန္လုပ္ဖို႔ လိုပါလိမ့္မယ္။
ၿပီးမွ ျပန္ၿပီး Patch လုပ္ရပါမယ္
Fepfz V1.0
Fepfz V1.0 ေဆာ့ဝဲကို လိုခ်င္သူမ်ား Dev-Host လင့္ၿဖင့္ ဒီမွာေဒါင္းယူပါ ဆိုဒ္က 276 KB နည္းနည္းေလးပဲရွိပါတယ္ ။
Fepfz V1.0 ေဆာ့ဝဲကို လိုခ်င္သူမ်ား Limelinx လင့္ၿဖင့္ ဒီမွာေဒါင္းယူပါ ဆိုဒ္က 276 KB နည္းနည္းေလးပဲရွိပါတယ္ ။
Fepfz V1.0 ေဆာ့ဝဲကို လိုခ်င္သူမ်ား Zippyshare လင့္ၿဖင့္ ဒီမွာေဒါင္းယူပါ ဆိုဒ္က 276 KB နည္းနည္းေလးပဲရွိပါတယ္ ။
Fepfz V1.0 ေဆာ့ဝဲကို လိုခ်င္သူမ်ား pCloud လင့္ၿဖင့္ ဒီမွာေဒါင္းယူပါ ဆိုဒ္က 276 KB နည္းနည္းေလးပဲရွိပါတယ္ ။
@@@@@@@@@@@@@@@@@@@@@@
Fepfz V1.3
Fepfz V1.3 ေဆာ့ဝဲကို လိုခ်င္သူမ်ား Dev-Host လင့္ၿဖင့္ ဒီမွာေဒါင္းယူပါ ဆိုဒ္က 276 KB နည္းနည္းေလးပဲရွိပါတယ္ ။
Fepfz V1.3 ေဆာ့ဝဲကို လိုခ်င္သူမ်ား Limelinx လင့္ၿဖင့္ ဒီမွာေဒါင္းယူပါ ဆိုဒ္က 276 KB နည္းနည္းေလးပဲရွိပါတယ္ ။
Fepfz V1.3 ေဆာ့ဝဲကို လိုခ်င္သူမ်ား Zippyshare လင့္ၿဖင့္ ဒီမွာေဒါင္းယူပါ ဆိုဒ္က 276 KB နည္းနည္းေလးပဲရွိပါတယ္ ။
Fepfz V1.3 ေဆာ့ဝဲကို လိုခ်င္သူမ်ား pCloud လင့္ၿဖင့္ ဒီမွာေဒါင္းယူပါ ဆိုဒ္က 276 KB နည္းနည္းေလးပဲရွိပါတယ္ ။
@@@@@@@@@@@@@@@@@@@@@@@@
Fepfz V2.0
Fepfz V2.0 ေဆာ့ဝဲကို လိုခ်င္သူမ်ား Dev-Host လင့္ၿဖင့္ ဒီမွာေဒါင္းယူပါ ဆိုဒ္က 276 KB နည္းနည္းေလးပဲရွိပါတယ္ ။
Fepfz V2.0 ေဆာ့ဝဲကို လိုခ်င္သူမ်ား Limelinx လင့္ၿဖင့္ ဒီမွာေဒါင္းယူပါ ဆိုဒ္က 276 KB နည္းနည္းေလးပဲရွိပါတယ္ ။
Fepfz V2.0 ေဆာ့ဝဲကို လိုခ်င္သူမ်ား Zippyshare လင့္ၿဖင့္ ဒီမွာေဒါင္းယူပါ ဆိုဒ္က 276 KB နည္းနည္းေလးပဲရွိပါတယ္ ။
Fepfz V2.0 ေဆာ့ဝဲကို လိုခ်င္သူမ်ား pCloud လင့္ၿဖင့္ ဒီမွာေဒါင္းယူပါ ဆိုဒ္က 276 KB နည္းနည္းေလးပဲရွိပါတယ္ ။
@@@@@@@@@@@@@@@@@@@@@@@@
Fepfz V2.1
Fepfz V2.1 ေဆာ့ဝဲကို လိုခ်င္သူမ်ား Dev-Host လင့္ၿဖင့္ ဒီမွာေဒါင္းယူပါ ဆိုဒ္က 276 KB နည္းနည္းေလးပဲရွိပါတယ္ ။
Fepfz V2.1 ေဆာ့ဝဲကို လိုခ်င္သူမ်ား Limelinx လင့္ၿဖင့္ ဒီမွာေဒါင္းယူပါ ဆိုဒ္က 276 KB နည္းနည္းေလးပဲရွိပါတယ္ ။
Fepfz V2.1 ေဆာ့ဝဲကို လိုခ်င္သူမ်ား Zippyshare လင့္ၿဖင့္ ဒီမွာေဒါင္းယူပါ ဆိုဒ္က 276 KB နည္းနည္းေလးပဲရွိပါတယ္ ။
Fepfz V2.1 ေဆာ့ဝဲကို လိုခ်င္သူမ်ား pCloud လင့္ၿဖင့္ ဒီမွာေဒါင္းယူပါ ဆိုဒ္က 276 KB နည္းနည္းေလးပဲရွိပါတယ္ ။
@@@@@@@@@@@@@@@@@@@@@
ဆိုေဆာ့ဝဲကို ေရးသားသူကေတာ့ Developer By : Dr.Kyaw Zaw Naing ၿဖစ္ပါတယ္ ။
မူရင္း Page ဆိုက္ၿဖစ္တဲ့ https://www.facebook.com/fepfz ကိုဝင္ေရာက္ၿပီး Like လုပ္ေပးၿခင္းၿဖင့္ ဂုဏ္ၿပဳသြားၾကပါဦး :)
Credit to>>> Djjoe Man (MMF)
ZawgyiOne Only Android 4.3 အထက္ေတြအတြက္ ttf ၿမန္မာေဖာင့္ပါ
Android V4.3 အထက္ေတြရဲ႕ ဖုန္းမွာ ( -် ) ( -ဳ ) ( -ဴ ) ( -ာ ) ( -္ ) ( -့ ) ေတြ
အထဲကိုဝင္ေနတဲ့ၿပသနာကို က်ေနာ္အနည္းငယ္ေၿဖရွင္းထားပါတယ္ ။
စာကိုတည့္မွန္စြာၿမင္ရမွာၿဖစ္ပါတယ္ ။
ေအာက္တြင္ေဖာ္ၿပထားသည့္
ပထမပံုကေတာ့ ေဖာင့္မထည့္ခင္ကပံုပါ ။ ဒုတိယပံုကေတာ့ ေဖာင့္ထည့္ၿပီးပံုပါ :)

 ZawgyiOne Only V4.3 . ttf ဖိုင္ေလး လိုခ်င္သူမ်ား ေအာက္မွာေဒါင္းယူပါ ။
ေဖာင့္ေၿပာင္းနည္းကိုေတာ့ နားလည္ၾကမယ္ထင္ပါတယ္ ။
ေဖာင့္ ttf ဖိုင္သည္ Root Explorer ေဆာ့ဝဲကေန သြင္းရမွာၿဖစ္တဲ့အတြက္
Root ရွိထားတဲ့ဖုန္းမ်ားသာ ထည့္သြင္းႏိူင္ပါတယ္ ။
4.3 အတြက္ေပးထားတဲ့ ttf ၿမန္မာေဖာင့္ကို ေဒါင္းၿပီးရင္ DroidSansFallback လို႕ အမည္ေၿပာင္းလိုက္ပါ ။
ေဒါင္းထားတဲ့ ေဖာင့္ DroidSansFallback.ttf ဖိုင္ကို Root Explorer ေဆာ့ဝဲထဲက System >>> font ဆိုတဲ့ဖိုဒါထဲကို ထည့္ေပးလိုက္ပါ ။
ထည့္ၿပီးရင္ ေဖာင့္အား rw - r - r ေပးၿပီး ဖုန္းကုိရီစတတ္ခ်ေပးလိုက္ပါ ၿပီးပါၿပီ :)
ZawgyiOne Only V4.3 . ttf ဖိုင္ကို Dev-Host လင့္ၿဖင့္ ဒီမွာေဒါင္းယူပါ ။
ZawgyiOne Only V4.3 . ttf ဖိုင္ကို Zippyshare လင့္ၿဖင့္ ဒီမွာေဒါင္းယူပါ ။
ZawgyiOne Only V4.3 . ttf ဖိုင္ကို pCloud လင့္ၿဖင့္ ဒီမွာေဒါင္းယူပါ ။
ZawgyiOne Only V4.3 . ttf ဖိုင္ကို FilePup လင့္ၿဖင့္ ဒီမွာေဒါင္းယူပါ ။
ZawgyiOne Only V4.3 . ttf ဖိုင္ကို Limelinx လင့္ၿဖင့္ ဒီမွာေဒါင္းယူပါ ။
credit to>>>Djjoe Man (MMF)
အထဲကိုဝင္ေနတဲ့ၿပသနာကို က်ေနာ္အနည္းငယ္ေၿဖရွင္းထားပါတယ္ ။
စာကိုတည့္မွန္စြာၿမင္ရမွာၿဖစ္ပါတယ္ ။
ေအာက္တြင္ေဖာ္ၿပထားသည့္
ပထမပံုကေတာ့ ေဖာင့္မထည့္ခင္ကပံုပါ ။ ဒုတိယပံုကေတာ့ ေဖာင့္ထည့္ၿပီးပံုပါ :)
4.3 အတြက္ ေဖာင့္မထည့္ခင္

4.3 အတြက္ ေဖာင့္ထည့္ၿပီး

ေဖာင့္ေၿပာင္းနည္းကိုေတာ့ နားလည္ၾကမယ္ထင္ပါတယ္ ။
ေဖာင့္ ttf ဖိုင္သည္ Root Explorer ေဆာ့ဝဲကေန သြင္းရမွာၿဖစ္တဲ့အတြက္
Root ရွိထားတဲ့ဖုန္းမ်ားသာ ထည့္သြင္းႏိူင္ပါတယ္ ။
4.3 အတြက္ေပးထားတဲ့ ttf ၿမန္မာေဖာင့္ကို ေဒါင္းၿပီးရင္ DroidSansFallback လို႕ အမည္ေၿပာင္းလိုက္ပါ ။
ေဒါင္းထားတဲ့ ေဖာင့္ DroidSansFallback.ttf ဖိုင္ကို Root Explorer ေဆာ့ဝဲထဲက System >>> font ဆိုတဲ့ဖိုဒါထဲကို ထည့္ေပးလိုက္ပါ ။
ထည့္ၿပီးရင္ ေဖာင့္အား rw - r - r ေပးၿပီး ဖုန္းကုိရီစတတ္ခ်ေပးလိုက္ပါ ၿပီးပါၿပီ :)
xxxxxxxxxxxxxxxxxxxxxxxxxxxxxxxxxxxxxxxxxxxxxxxx
" လိုအပ္သည့္ Root Explorer Pro ေဆာ့ဝဲအားေဒါင္းရန္ "
Root Explorer Pro V3.1.3 ေဆာ့ဝဲကို Dev Host လင့္ၿဖင့္ ဒီမွာေဒါင္းယူပါ ။
Root Explorer Pro V3.1.3 ေဆာ့ဝဲကို Zippyshare လင့္ၿဖင့္ ဒီမွာေဒါင္းယူပါ ။
Root Explorer Pro V3.1.3 ေဆာ့ဝဲကို Limelinx လင့္ၿဖင့္ ဒီမွာေဒါင္းယူပါ ။
Root Explorer Pro V3.1.3 ေဆာ့ဝဲကို FilePup လင့္ၿဖင့္ ဒီမွာေဒါင္းယူပါ ။
xxxxxxxxxxxxxxxxxxxxxxxxxxxxxxxxxxxxxxxxxxxxxxxxxxxx
" ZawgyiOne Only V4.3 .ttf ဖိုင္အား ေဒါင္းရန္ "
ZawgyiOne Only V4.3 . ttf ဖိုင္ကို Dev-Host လင့္ၿဖင့္ ဒီမွာေဒါင္းယူပါ ။
ZawgyiOne Only V4.3 . ttf ဖိုင္ကို Zippyshare လင့္ၿဖင့္ ဒီမွာေဒါင္းယူပါ ။
ZawgyiOne Only V4.3 . ttf ဖိုင္ကို pCloud လင့္ၿဖင့္ ဒီမွာေဒါင္းယူပါ ။
ZawgyiOne Only V4.3 . ttf ဖိုင္ကို FilePup လင့္ၿဖင့္ ဒီမွာေဒါင္းယူပါ ။
ZawgyiOne Only V4.3 . ttf ဖိုင္ကို Limelinx လင့္ၿဖင့္ ဒီမွာေဒါင္းယူပါ ။
credit to>>>Djjoe Man (MMF)
Blog မွာ ႏွင္းေတြက်လာမယ္

snow ေတြေတာင္လိုပုံလာမယ္
<script src="https://raw.github.com/scottschiller/Snowstorm/master/snowstorm-min.js"></script>
ပုံမွန္ snow
<script src="http://bbs.1lou.com/plugin/godron_snow/snowstorm-min.js" type="text/javascript"></script>
snow with christmas
<script type="text/javascript">
document.write('<style type="text/css">body{padding-bottom:20px}</style><img style="position:fixed;z-index:9999;top:0;left:0" src="http://3.bp.blogspot.com/-FIi2lhedZlM/UqUh7DiIQBI/AAAAAAAABw0/zGmBkOAzb6g/s1600/vbbstyle.net---top-left.png" _cke_saved_src="http://3.bp.blogspot.com/-FIi2lhedZlM/UqUh7DiIQBI/AAAAAAAABw0/zGmBkOAzb6g/s1600/vbbstyle.net---top-left.png"/><img style="position:fixed;z-index:9999;top:0;right:0" src="http://3.bp.blogspot.com/-e1ht8cs_3Pc/UqUiMUGdW3I/AAAAAAAABw8/qyiyeOVv0cM/s1600/vbbstyle.net---top-right.png"/><div style="position:fixed;z-index:9999;bottom:-50px;left:0;width:100%;height:104px;background:url(http://1.bp.blogspot.com/-QMaoKtD-U74/UqUiYNtnz0I/AAAAAAAABxE/3BVD-f1E1uE/s1600/vbbstyle.net---footer.png) repeat-x bottom left;"></div><img style="position:fixed;z-index:9999;bottom:20px;left:20px" src="http://1.bp.blogspot.com/-Ss5kPDUVIbM/UqUikRK8PqI/AAAAAAAABxM/6fBmSCbU5lI/s1600/vbbstyle.net---bottom-left.png"/>');
var no=100;var hidesnowtime=0;var snowdistance='pageheight';var ie4up=(document.all)?1:0;var ns6up=(document.getElementById&&!document.all)?1:0;function iecompattest(){return(document.compatMode&&document.compatMode!='BackCompat')?document.documentElement:document.body}var dx,xp,yp;var am,stx,sty;var i,doc_width=800,doc_height=600;if(ns6up){doc_width=self.innerWidth;doc_height=self.innerHeight}else if(ie4up){doc_width=iecompattest().clientWidth;doc_height=iecompattest().clientHeight}dx=new Array();xp=new Array();yp=new Array();am=new Array();stx=new Array();sty=new Array();for(i=0;i<no;++i){dx[i]=0;xp[i]=Math.random()*(doc_width-50);yp[i]=Math.random()*doc_height;am[i]=Math.random()*20;stx[i]=0.02+Math.random()/10; sty[i]=0.7+Math.random();if(ie4up||ns6up){document.write('<div id="dot'+i+'" style="POSITION:absolute;Z-INDEX:'+i+';VISIBILITY:visible;TOP:15px;LEFT:15px;"><span style="font-size:18px;color:#fff">*</span><\/div>')}}function snowIE_NS6(){doc_width=ns6up?window.innerWidth-10:iecompattest().clientWidth-10;doc_height=(window.innerHeight&&snowdistance=='windowheight')?window.innerHeight:(ie4up&&snowdistance=='windowheight')?iecompattest().clientHeight:(ie4up&&!window.opera&&snowdistance=='pageheight')?iecompattest().scrollHeight:iecompattest().offsetHeight;for(i=0;i<no;++i){yp[i]+=sty[i];if(yp[i]>doc_height-50){xp[i]=Math.random()*(doc_width-am[i]-30);yp[i]=0;stx[i]=0.02+Math.random()/10;sty[i]=0.7+Math.random()}dx[i]+=stx[i];document.getElementById('dot'+i).style.top=yp[i]+'px';document.getElementById('dot'+i).style.left=xp[i]+am[i]*Math.sin(dx[i])+'px'}snowtimer=setTimeout('snowIE_NS6()',10)}function hidesnow(){if(window.snowtimer){clearTimeout(snowtimer)}for(i=0;i<no;i++)document.getElementById('dot'+i).style.visibility='hidden'}if(ie4up||ns6up){snowIE_NS6();if(hidesnowtime>0)setTimeout('hidesnow()',hidesnowtime*1000)}
</script>
Samsung Galaxy Mega 6.3 - i9205 ကို Root လုပ္ၿပီး ၿမန္မာစာထည့္နည္း
Samsung Galaxy Mega 6.3 - i9205 ကို Root လုပ္ၿပီး ၿမန္မာစာထည့္ရေအာင္
Downloading..... ဝင္နည္း
 Odin3 V3.07 ေဆာ့ဝဲ၏ အေနအထား

ကိုယ္တိုင္ စမ္းသပ္ၿပီးထားပံု

Root နဲ႔ MM Font အတြက္ လိုအပ္တဲ့ဖိုင္ကို
( ဒီမွာေဒါင္းပါ )
( ဒီလင့္မွာလဲ ေဒါင္းႏိုင္ပါတယ္ )
( ဒီလင့္မွာလဲ ေဒါင္းႏိူင္ပါတယ္ )
ေဒါင္းၿပီးရင္ ဇစ္ေၿဖလိုက္ပါ ဇစ္ေၿဖလို႕ရလာတဲ့ ဖိုဒါထဲက
Root Check Pro V1.2.1
Super SU V1.34
SAMUNGMMfont V1.0.1
အဲ့ သံုးခုကို ဖုန္းမန္မိုရီကဒ္ထဲကို ထည့္ထားေပးပါ
သင့္ဖုန္းကို PC နဲ႕ခ်ိတ္တဲ့အခါမွာ USB ကိုPC ကသိဖို႕ samsung kies ကို PC မွာအင္စေတာလုပ္ထားဖို႕လိုပါတယ္ သြင္းထားတာမရွိပါက ( ဒီမွာေဒါင္းၿပီး )အင္စေတာလုပ္လိုက္ပါ
samsung kies ကို PC မွာသြင္းၿပီးၿပီဆိုရင္ သင့္ဖုန္းရဲ႕USB debugging ကို အမွန္ၿခစ္ေပးၿပီး ၾကိဳးခ်ိတ္ရပါမယ္
USB debugging စာ ရွာမေတြ႔သူမ်ား ( ဒီမွာႏွိပ္ၿပီးသြားဖတ္လိုက္ပါ )
ကဲ့ အားလံုးၿပီးၿပီဆိုရင္ ဖုန္းကိုပါဝါပိတ္လိုက္ပါ ။
ၿပီးရင္ Power + Home + Vol Down ခုလုတ္သံုးခုကိုဆြဲလွ်က္ဖိထားပါ စာေတြေပၚလာၿပီဆိုရင္လႊတ္လိုက္ပါ အဲဒီမွာ Vol Up ခုလုတ္ကိုတစ္ခ်က္ႏွိပ္လိုက္ပါ ဖုန္းမွာDownloading...... ဆိုၿပီးၿပေနပါလိမ့္မယ္
ၿပီးရင္ဖုန္းကို PC နဲ႕ USB ၾကိဳးခ်ိတ္ေပးလိုက္ပါ
PC မွာ ခုဏက ဇစ္ေၿဖလိုက္တဲ့ ဖိုဒါထဲက Odin3 V3.07 ေဆာ့ဝဲကိုဖြင့္လိုက္ပါ ပံုထဲကအတိုင္း အေပၚဘယ္ဘက္ေထာင့္က အကြက္ေသးေလးထဲမွာ အေရာင္ေလးၿပေနရပါမယ္ သင့္ဖုန္းကိုPC ကသိေနပါၿပီ
ေသခ်ာၿပီဆိုရင္ PDA ဆိုတဲ့ေနရာမွာ အမွန္ေလးၿခစ္ေပးၿပီး PDA ကိုႏွိပ္လိုက္ပါ My Documents ေဘာက္ေလးထြက္လာပါမယ္
အဲဒီမွာကိုယ္ေဒါင္းၿပီး ဇစ္ေၿဖလိုက္တဲ့ဖိုဒါထဲသို႕ သြားလိုက္ပါ အဲ့မွာ Galaxy Mega 6.3 i9205 boot.img ဆိုတဲ့ေကာင္ေလးကိုေရြးလိုက္ပါ Odin ထဲေရာက္သြားပါၿပီ ၿပီးရင္ Startကိုႏွိပ္လိုက္ပါ Odin က အလုပ္လုပ္ေနပါလိမ့္မယ္ ၿပီးတာနဲ႕ေအာ္တို ပါဝါၿပန္ဖြင့္လာပါလိမ့္မယ္ အားလံုးေသခ်ာပြင့္ၿပီးရင္ ၾကိဳးၿဖဳတ္လိုက္လို႕ရပါၿပီ ။
( """ ထိုတဲ့သို႕ေနာက္တစ္ၾကိမ္ """ ဖုန္းကိုပါဝါပိတ္ Downloading...... ဝင္ Odin က PDA မွာ အမွန္ေလးၿခစ္ေပးၿပီး PDA ကိုႏွိပ္ Galaxy Mega 6.3 i9200 CWM ကိုေရြးၿပီး Start ကိုႏွိပ္လိုက္ပါ ၿပီးတာနဲ႕ေအာ္တို ပါဝါၿပန္ဖြင့္လာပါလိမ့္မယ္ အားလံုးေသခ်ာပြင့္ၿပီးရင္ ၾကိဳးၿဖဳတ္လိုက္လို႕ရပါၿပီ ။ )
ၿပီးရင္ သင့္ဖုန္းထဲက My File ထဲသြားၿပီး သင့္မန္မိုရီကဒ္ထဲမွာထည့္ထားတဲ့ Super SU V1.34ဆိုတဲ့ Apk ေလးကို အင္စေတာလုပ္ေပးလိုက္ပါ ။ Root Check Pro V1.2.1 ကိုလဲ အင္စေတာလုပ္ေပးလိုက္ပါ ။
ၿပီးရင္အၿပင္မွာ Super SU အိုင္ကြန္ေလးေရာက္ေနပါၿပီ ႏွိပ္ဖြင့္လိုက္ပါ သူေမးတာ OK သာေရြးေၿဖလိုက္ပါ ဖုန္းကိုု Restart ခ်ဖို႕ရန္စာေပၚလာပါမယ္ ႏွိပ္ေပးလိုက္ပါ ပိတ္ၿပီးၿပန္ပြင့္လာပါမယ္ ။ Root ၿဖစ္သြားပါၿပီ :)
Root ၿဖစ္မၿဖစ္ စစ္ေဆးႏိူင္တဲ့ Root Check Pro အိုင္ကြန္ထဲကိုဝင္လိုက္ပါ စာေမးရင္ Grantဆိုတဲ့စာကိုသာ ေရြးေပးလိုက္ပါ ။ Root ေအာင္ၿမင္ေၾကာင္း စာအစိမ္းေရာင္နဲ႕ ၿပေနပါလိမ့္မယ္ ။
မၿပလဲကိစၥမရွိပါဘူး CWM ဝင္သြားၿပီးတဲ့အတြက္ ၿမန္မာေဖာင့္ ထည့္လို႕ရပါတယ္ ၿမန္မာေဖာင့္ထည့္လိုက္ၾကရေအာင္...
×××××××
ၿမန္မာေဖာင့္ထည့္နည္း
ၿပီးရင္ ဖုန္းကိုပါဝါပိတ္ပါမယ္ ။ ၿပီးရင္ Power + Home + Vol Upခုလုတ္သံုးခုကိုဆြဲလွ်က္ဖိထားပါ အေပၚနားမွာ စာတန္းအနီနဲ႕ ဆမ္ေဆာင္းလိုဂိုေပၚလာၿပီဆိုရင္လြတ္ေပးလိုက္ပါ
Recovery ၿဖစ္တဲ့ စာေတြထဲေရာက္သြားပါၿပီ ။
ေအာက္ကၿပထားတဲ့စာမ်ားကို အသံအတိုးအက်ယ္ခုလုတ္နဲ႕ သြားေရြးခ်ယ္ၿပီး ။ ပါဝါခုလုတ္ႏွင့္ OK အၿဖစ္ ေရြးခ်ယ္ပါ ။
install zip update pakage >>>>>> choose zip from external sdcard >>>>>SAMSUNGFont V1.0.1 >>>> Yes - Install SAMSUNGMMfont ကိုေရြးေပးလိုက္ပါ အင္စေတာၿပီးသြားရင္ Go Back+++++ >>>>> reboot systen now >>>> ဖုန္းမွာ ပိတ္သြားၿပီး ၿပန္ပြင့္လာပါလိမ့္မယ္ သင့္ဖုန္းမွာ ၿမန္မာလိုေနရာတိုင္း ၿမင္ရသြားပါၿပီ
ၿမန္မာကီးဘုတ္ကိုေတာ့ ( ဒီမွာေဒါင္းၿပီး ) ဖုန္းထဲအင္စေတာလုပ္လိုက္ပါ ကို္ယ္တိုင္သာခ်ိန္းလိုက္ပါေနာ္ မရွင္းၿပေတာ့ပါဘူး တိန္႕ တိန္ တိန္ :D
ကိုယ္တိုင္စမ္းသပ္ၿပီးထားတဲ့အတြက္ အားလံုးပဲ အဆင္ေၿပၾကပါေစ.....
Credit to : Djjoe Man (MMF)
Downloading..... ဝင္နည္း


ကိုယ္တိုင္ စမ္းသပ္ၿပီးထားပံု

Root နဲ႔ MM Font အတြက္ လိုအပ္တဲ့ဖိုင္ကို
( ဒီမွာေဒါင္းပါ )
( ဒီလင့္မွာလဲ ေဒါင္းႏိုင္ပါတယ္ )
( ဒီလင့္မွာလဲ ေဒါင္းႏိူင္ပါတယ္ )
ေဒါင္းၿပီးရင္ ဇစ္ေၿဖလိုက္ပါ ဇစ္ေၿဖလို႕ရလာတဲ့ ဖိုဒါထဲက
Root Check Pro V1.2.1
Super SU V1.34
SAMUNGMMfont V1.0.1
အဲ့ သံုးခုကို ဖုန္းမန္မိုရီကဒ္ထဲကို ထည့္ထားေပးပါ
သင့္ဖုန္းကို PC နဲ႕ခ်ိတ္တဲ့အခါမွာ USB ကိုPC ကသိဖို႕ samsung kies ကို PC မွာအင္စေတာလုပ္ထားဖို႕လိုပါတယ္ သြင္းထားတာမရွိပါက ( ဒီမွာေဒါင္းၿပီး )အင္စေတာလုပ္လိုက္ပါ
samsung kies ကို PC မွာသြင္းၿပီးၿပီဆိုရင္ သင့္ဖုန္းရဲ႕USB debugging ကို အမွန္ၿခစ္ေပးၿပီး ၾကိဳးခ်ိတ္ရပါမယ္
USB debugging စာ ရွာမေတြ႔သူမ်ား ( ဒီမွာႏွိပ္ၿပီးသြားဖတ္လိုက္ပါ )
ကဲ့ အားလံုးၿပီးၿပီဆိုရင္ ဖုန္းကိုပါဝါပိတ္လိုက္ပါ ။
ၿပီးရင္ Power + Home + Vol Down ခုလုတ္သံုးခုကိုဆြဲလွ်က္ဖိထားပါ စာေတြေပၚလာၿပီဆိုရင္လႊတ္လိုက္ပါ အဲဒီမွာ Vol Up ခုလုတ္ကိုတစ္ခ်က္ႏွိပ္လိုက္ပါ ဖုန္းမွာDownloading...... ဆိုၿပီးၿပေနပါလိမ့္မယ္
ၿပီးရင္ဖုန္းကို PC နဲ႕ USB ၾကိဳးခ်ိတ္ေပးလိုက္ပါ
PC မွာ ခုဏက ဇစ္ေၿဖလိုက္တဲ့ ဖိုဒါထဲက Odin3 V3.07 ေဆာ့ဝဲကိုဖြင့္လိုက္ပါ ပံုထဲကအတိုင္း အေပၚဘယ္ဘက္ေထာင့္က အကြက္ေသးေလးထဲမွာ အေရာင္ေလးၿပေနရပါမယ္ သင့္ဖုန္းကိုPC ကသိေနပါၿပီ
ေသခ်ာၿပီဆိုရင္ PDA ဆိုတဲ့ေနရာမွာ အမွန္ေလးၿခစ္ေပးၿပီး PDA ကိုႏွိပ္လိုက္ပါ My Documents ေဘာက္ေလးထြက္လာပါမယ္
အဲဒီမွာကိုယ္ေဒါင္းၿပီး ဇစ္ေၿဖလိုက္တဲ့ဖိုဒါထဲသို႕ သြားလိုက္ပါ အဲ့မွာ Galaxy Mega 6.3 i9205 boot.img ဆိုတဲ့ေကာင္ေလးကိုေရြးလိုက္ပါ Odin ထဲေရာက္သြားပါၿပီ ၿပီးရင္ Startကိုႏွိပ္လိုက္ပါ Odin က အလုပ္လုပ္ေနပါလိမ့္မယ္ ၿပီးတာနဲ႕ေအာ္တို ပါဝါၿပန္ဖြင့္လာပါလိမ့္မယ္ အားလံုးေသခ်ာပြင့္ၿပီးရင္ ၾကိဳးၿဖဳတ္လိုက္လို႕ရပါၿပီ ။
( """ ထိုတဲ့သို႕ေနာက္တစ္ၾကိမ္ """ ဖုန္းကိုပါဝါပိတ္ Downloading...... ဝင္ Odin က PDA မွာ အမွန္ေလးၿခစ္ေပးၿပီး PDA ကိုႏွိပ္ Galaxy Mega 6.3 i9200 CWM ကိုေရြးၿပီး Start ကိုႏွိပ္လိုက္ပါ ၿပီးတာနဲ႕ေအာ္တို ပါဝါၿပန္ဖြင့္လာပါလိမ့္မယ္ အားလံုးေသခ်ာပြင့္ၿပီးရင္ ၾကိဳးၿဖဳတ္လိုက္လို႕ရပါၿပီ ။ )
ၿပီးရင္ သင့္ဖုန္းထဲက My File ထဲသြားၿပီး သင့္မန္မိုရီကဒ္ထဲမွာထည့္ထားတဲ့ Super SU V1.34ဆိုတဲ့ Apk ေလးကို အင္စေတာလုပ္ေပးလိုက္ပါ ။ Root Check Pro V1.2.1 ကိုလဲ အင္စေတာလုပ္ေပးလိုက္ပါ ။
ၿပီးရင္အၿပင္မွာ Super SU အိုင္ကြန္ေလးေရာက္ေနပါၿပီ ႏွိပ္ဖြင့္လိုက္ပါ သူေမးတာ OK သာေရြးေၿဖလိုက္ပါ ဖုန္းကိုု Restart ခ်ဖို႕ရန္စာေပၚလာပါမယ္ ႏွိပ္ေပးလိုက္ပါ ပိတ္ၿပီးၿပန္ပြင့္လာပါမယ္ ။ Root ၿဖစ္သြားပါၿပီ :)
Root ၿဖစ္မၿဖစ္ စစ္ေဆးႏိူင္တဲ့ Root Check Pro အိုင္ကြန္ထဲကိုဝင္လိုက္ပါ စာေမးရင္ Grantဆိုတဲ့စာကိုသာ ေရြးေပးလိုက္ပါ ။ Root ေအာင္ၿမင္ေၾကာင္း စာအစိမ္းေရာင္နဲ႕ ၿပေနပါလိမ့္မယ္ ။
မၿပလဲကိစၥမရွိပါဘူး CWM ဝင္သြားၿပီးတဲ့အတြက္ ၿမန္မာေဖာင့္ ထည့္လို႕ရပါတယ္ ၿမန္မာေဖာင့္ထည့္လိုက္ၾကရေအာင္...
×××××××
ၿမန္မာေဖာင့္ထည့္နည္း
ၿပီးရင္ ဖုန္းကိုပါဝါပိတ္ပါမယ္ ။ ၿပီးရင္ Power + Home + Vol Upခုလုတ္သံုးခုကိုဆြဲလွ်က္ဖိထားပါ အေပၚနားမွာ စာတန္းအနီနဲ႕ ဆမ္ေဆာင္းလိုဂိုေပၚလာၿပီဆိုရင္လြတ္ေပးလိုက္ပါ
Recovery ၿဖစ္တဲ့ စာေတြထဲေရာက္သြားပါၿပီ ။
ေအာက္ကၿပထားတဲ့စာမ်ားကို အသံအတိုးအက်ယ္ခုလုတ္နဲ႕ သြားေရြးခ်ယ္ၿပီး ။ ပါဝါခုလုတ္ႏွင့္ OK အၿဖစ္ ေရြးခ်ယ္ပါ ။
install zip update pakage >>>>>> choose zip from external sdcard >>>>>SAMSUNGFont V1.0.1 >>>> Yes - Install SAMSUNGMMfont ကိုေရြးေပးလိုက္ပါ အင္စေတာၿပီးသြားရင္ Go Back+++++ >>>>> reboot systen now >>>> ဖုန္းမွာ ပိတ္သြားၿပီး ၿပန္ပြင့္လာပါလိမ့္မယ္ သင့္ဖုန္းမွာ ၿမန္မာလိုေနရာတိုင္း ၿမင္ရသြားပါၿပီ
ၿမန္မာကီးဘုတ္ကိုေတာ့ ( ဒီမွာေဒါင္းၿပီး ) ဖုန္းထဲအင္စေတာလုပ္လိုက္ပါ ကို္ယ္တိုင္သာခ်ိန္းလိုက္ပါေနာ္ မရွင္းၿပေတာ့ပါဘူး တိန္႕ တိန္ တိန္ :D
ကိုယ္တိုင္စမ္းသပ္ၿပီးထားတဲ့အတြက္ အားလံုးပဲ အဆင္ေၿပၾကပါေစ.....
Credit to : Djjoe Man (MMF)
Android V4.2.x အဆင့္ေတြမွာ USB debuggin ေဖာ္နည္း
Android V4.2.x အဆင့္ေတြမွာ USB ၾကိဳးခ်ိတ္ရန္ Settings >>> More >>> ထဲတြင္ Developer Options စာမပါလို႕ On လုပ္ေပးဖို႕ ရွာမေတြ႔သူမ်ား
About Device ထဲကိုဝင္လိုက္ပါ ။
ေအာက္က Build Number ဆိုတဲ့ စာကြက္ေလးကို လက္ၿဖင့္ေလးငါးခ်က္ေလာက္ ႏွိပ္မရေတာ့တဲ့အထိ ဆက္တိုက္ႏွိပ္လိုက္ပါ ။
ၿပီးရင္ ဘက္တစ္ခ်က္ဆုတ္ၿပီး More ထဲမွာ ၿပန္ဝင္ၾကည့္လိုက္ပါ Developer Options ဆိုတဲ့စာတန္းေပၚလာတာကိုေတြ႔ရပါမယ္ ဝင္လိုက္ၿပီး USB debugging ကို On ေပးလို႕ရပါၿပီ
About Device ထဲကိုဝင္လိုက္ပါ ။
ေအာက္က Build Number ဆိုတဲ့ စာကြက္ေလးကို လက္ၿဖင့္ေလးငါးခ်က္ေလာက္ ႏွိပ္မရေတာ့တဲ့အထိ ဆက္တိုက္ႏွိပ္လိုက္ပါ ။
ၿပီးရင္ ဘက္တစ္ခ်က္ဆုတ္ၿပီး More ထဲမွာ ၿပန္ဝင္ၾကည့္လိုက္ပါ Developer Options ဆိုတဲ့စာတန္းေပၚလာတာကိုေတြ႔ရပါမယ္ ဝင္လိုက္ၿပီး USB debugging ကို On ေပးလို႕ရပါၿပီ
Tuesday, February 11, 2014
Authenticator security အေျကာင္း
သင့္ဖုန္းက android ဖုန္းသို႕မဟုတ္ apple ျဖစ္ခဲ့ရင္
ဖုန္း အတြက္ သက္ဆိုင္ရာ market မွာ mobile ....
"Authenticator" ေဆာ့ဝဲကို install လုပ္ျပီ ရယူနိဳင္ပါတယ္ ...
သင့္အေကာင့္ကို 2 step နဲ႕ ကာကြယ္နိုင္ပါေသးတယ္....
အကယ္၍ 2 step ကိုမျကိုက္ႏွစ္သက္ခဲ့ရင္ေတာ့
Authenticator ကိုသုံႏိုင္ပါတယ္ ...
ႏွစ္ခုစလုံးကသေဘာတရားခ်င္းဆင္တူပါတယ္
2 step ကို ဖြင့္ထားခဲ့မယ္ဆိုရင္...သင့္google အေကာင့္ကို sign in ဝင္တဲ့အခါတိုင္းမွာ
password ရိုက္လို႕မွန္ရင္ေနာက္တဆင့္ verify code လိုပါေသးတယ္
အဒီ verify code က google ကေနျပီေတာ့သင့္ဖုန္းဆီကို ပို႕ေပးမွသာလွ်င္ အေကာင့္ကိုဖြင့္နိဳင္မွာပါ...
Authenticator ရဲ႕သေဘာတရားက ေတာ့ google ဆီကေနမေတာင္းပဲ ဖုန္းထဲကေန
ကုဒ္နံပါတ္ျကည့္တဲ့နည္းပါပဲ ေအာက္ကပုံကိုျကည့္ျကည့္ပါ

2 step ကို ဖြင္႕ခ်င္ရင္ ဒီလင္႕အတိုင္းသြားပါ.. ပုံမွာျပထားတဲ႕အတိုင္း.. get started ကို ႏွိပ္ပါ

က်န္တာေတာ႕ ဆက္လုပ္တတ္မယ္ထင္ပါတယ္..
thank you
ykh
Monday, February 10, 2014
Thor: The Dark World (2013) 720p BrRip x264 - YIFY

| ေဒါင္းရန္ hash: | 420FFA5CB90241D398A75FA6AB314B4D7B7E1EAC | |
ျမန္မာစာတမ္းထိုး... ျကည္႕ခ်င္ရင္ဒီမွာ.. ေဒါင္းပါ...
Thousands of years ago, a race of beings known as Dark Elves tried to send the universe into darkness by using a weapon known as the Aether. Warriors from Asgard stop them but their leader Malekith escapes to wait for another opportunity. The warriors find the Aether and since it cannot be destroyed, they try to hide it. In the present day, Jane Foster awaits the return of Thor although it has been two years since they last saw once another. In the meantime, Thor has been trying to bring peace to the nine realms. Jane discovers an anomaly similar to the one that brought Thor to Earth. She goes to investigate, finds a wormhole, and is sucked into it. Back on Asgard, Thor wishes to return to Earth but his father, Odin refuses to let him. Thor learns from Heimdall, who can see into all of the realms, that Jane disappeared. Thor then returns to Earth just as Jane reappears. However, when some policemen try to arrest her, an unknown energy repulses them. Thor then brings Jane to Asgard to ...

YouTube Video download

internet downloadmanager မွာသုံးလို႕မရတဲ႕အခါမ်ိဳးမွာဒီေကာင္ေလးက အေတာ္ကို အဆင္ေျပပါတယ္..

Well known online video services support
This software can download and convert online videos from all well known online services like YouTube, Google Video, MySpace, iFilm, Break, PutFile.
Offline video conversion
You can also convert previously downloaded video files to any format supported by YouTube Video Grabber.
Multiple output video formats support
Supports conversion to wide range of video formats, such as AVI, 3GP, 3GPP, WMV, DivX, Xvid, WMV, MPEG-1, MPEG-2, MPEG-3, MPEG-4.
Audio track extraction
You can save audio track of any video file or online video to audio file. MP3, WMA, M4A, AAC, RA audio formats of output file are supported.
General internet page embedded video download
Software can search for supported online video on any internet page you provide, download and convert them to desired video format.
Extension plug-in modules support
Video tracking is implemented as set of plug-in modules with online updates. You can also request for new plug-in if you found an internet page with video not supported by YouTube Video Grabber.
Full drag and drop support
You can drag files already saved on your computer from Windows Explorer or any other program and drop them to YouTube Video Grabber, drag'n'drop of URLs from your internet browser is also supported.
Windows Clipboard support
You can Copy and Paste URLs with online video from Windows Clipboard, auto track for URLs to online video sites as well.
Batch download and conversion
Batch processing implemented to speed up mass download and conversion of video files.
YouTube auto-login
For those people who have accounts on YouTube this software offers auto-login to save files which require to be logged in to access them.
Eligible Price
You can get it all with life-time technical support and all future updates for only $14.95 US Dollars
Blogger မ်ားအတြက္ Link တစ္ခု တစ္ခ်က္ႏွိပ္ရံုနဲ႕ Link ေတြအမ်ားၾကီးခြဲထြက္ေအာင္ျပဳလုပ္နည္း။

<a href="လင့္ထည့္ရန္
" target="_blank" onclick="window.open("လင့္ထည့္ရန္/"); window.open("လင့္ထည့္ရန္/"); window.open("လင့္ထည့္ရန္/");window.open("လင့္ထည့္ရန္/");">လင့္နာမည္ေလးပါ ...</a>
အဲဒါေလးဘဲဗ်ာ ဘာမွမခဲယဥ္းပါဘူးလြယ္လြယ္ေလးပါ။ အခုေလာေလာဆယ္မွာေတာ့ ကၽြန္ေတာ္ကနမူနာ အေနနဲ႕ Link 5 ခု ထည့္ျပထားပါတယ္ဗ်ာ။ ထပ္တိုးခ်င္ရင္ဘဲျဖစ္ျဖစ္ ေလွ်ာ့ခ်င္ရင္ဘဲျဖစ္ျဖစ္ window.open("လင့္ထည့္ရန္/") အခု Link ေလးနဲ႕ဘဲ အတိုးအေလွ်ာ့လုပ္သြားႏိုင္ပါတယ္ဗ်ာ။
credit>>> http://www.pyaephyo.com/
Remove deafult sharing buttons from blogger blog
Hello Readers, In this post i will tell you how to remove default sharing buttons in blogger blog. Unziptech has shared many useful articles for Blogging and SEO optimization tips and this post focuses on the same category. There are many people who opt for custom blogger templates and they have got built in sharing buttons. In that case people prefer to remove the default sharing buttons to minimize the page load time and the external links on your Blog. This post will feature a short tutorial to remove the default sharing buttons which includes Google+, Facebook, Twitter and Gmail etc from your blogger blog.

In this post I will tell you 2 methods that will help you doing this task. You can remove these buttons by editing the blogger template or by editing the settings from the layout menu. I will tell you both the methods and you can choose the one, you think would be easy for you. Now, Let us see how to remove the default sharing buttons in blogger blog:
Method 1:
In this method we will remove these buttons by editing the settings from the layout menu. For this you need to follow these steps:
First of all, Login in to your Blogger account.
Navigate to the Layout menu, it will show the current layout of your blog.
Click on the "Edit" menu which is displaying under the Post Layout.
It will pop-up a window like this:

Now scroll down and find the checkbox, I highlighted in the above screen shot by red color.
Uncheck the Checkbox in front of the sharing buttons.
Save the arrangement and you are done.
Click on View Blog and check it yourself.
Method 2:
The above method will do the trick for you. In case it does not work or you want to do it by editing the template, you can follow these steps:
First of all, Login into your Blogger account.
Navigate to the Template menu.
It is recommended to take backup of your blogger blog to avoid any loss, because we are going to edit it.
After taking the backup, click on Edit HTML from the template menu.
Now find the following line of code:
<b:include data='post' name='shareButtons'/>
Make it a HTML comment by enclosing it in the comment tag like this:
<!--<b:include data='post' name='shareButtons'/>-->
You may also remove this code from your template, but remember this change will be permanent.
Click on Save Template and check your blog.
You just removed the default sharing buttons from your blogger blog. The above mentioned methods are tested by me on a few standard and custom blogger templates. In case you face any problem you can comment here, I will be glad to help you.
credit to>>>> http://www.unziptech.com/
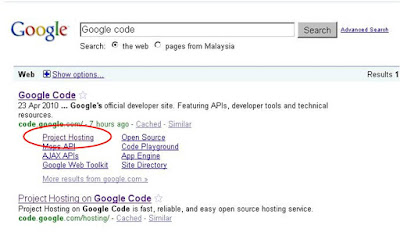
Upload the JavaScript (JS Files) to Google Code
Upload the JavaScript (JS Files) to Google Code
GoogleCode.com is one of the best site that help bloggers to host their JS (Javascripts) files for free. This article explains about how to upload the JS files and using it to your blogger templates.
1. Sign in to your google account. I recommend with your gmail.com account. If you don't have one, please create it first.
2. Find googlecode.com in your search engine
3. choose the googlecode's project hosting link
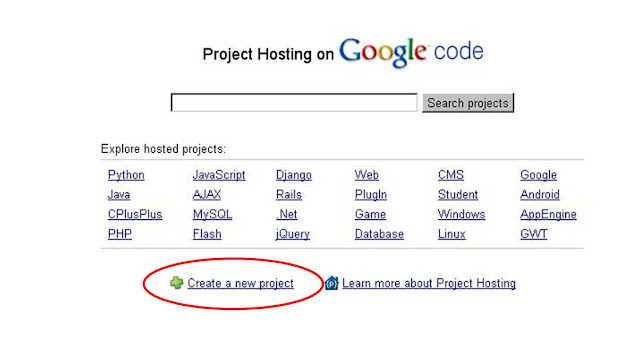
4. Create A New Project by click the new project link
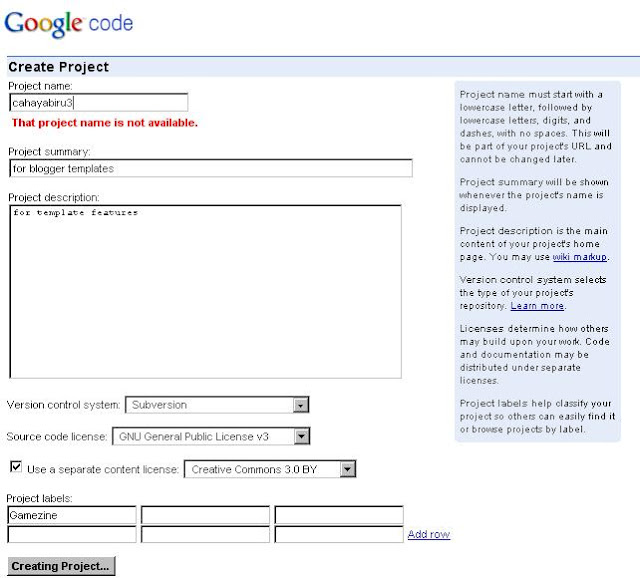
5. Fill all the form such as: project name, licences, labels and etc. And, Please choose any license. (Sorry, I don't give any specific information about every single license for you. If you want to know it, please find it in search engine by yourself). The form is just like the screen shot below :
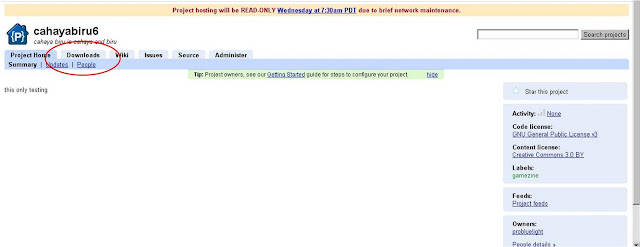
6. After you push the "Creating Project" button, you will be directed to the list page. Then click the Download Tabs. Please see the screen shot below.
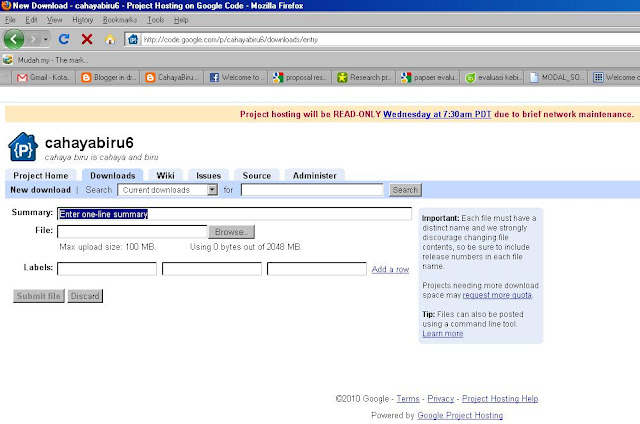
7. After click it. You will see the page below. Then, please click the button "New Download".
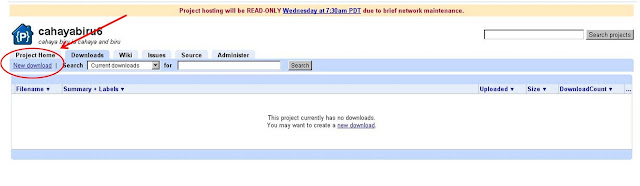
Even though it said new download, actually, that link is for upload the JS files. So, after you click it, then you can upload your JS files into the googlecode.com.
8. Fill the form such as summary, and label, and then Click Browse. Upload all your files. Please see below
9. After uploading, you will be given links. Put on your mouse pointer on the link. then copy its link location. Please see the screen shot below.

10. Great, you get the link location. How to use it ...?
Below is the HTML structure. Just change the red which say YOUR GOOGLE LINK LOCATION with your own link.
<script src='YOUR-GOOGLECODE-LINK-LOCATION' type='text/javascript'></script>
example:
<script src='http://cahayabiru6.googlecode.com/files/jquery-1.2.6.min.js' type='text/javascript'></script>
After that, Now you have to put it in the template.
In your template, please find :
]]></b:skin>
paste the code below ]]></b:skin> .
11. OK. You're done.
If you like my article, please feel free to subscribe to my feedburner email feeds. Thanks.
GoogleCode.com is one of the best site that help bloggers to host their JS (Javascripts) files for free. This article explains about how to upload the JS files and using it to your blogger templates.
1. Sign in to your google account. I recommend with your gmail.com account. If you don't have one, please create it first.
2. Find googlecode.com in your search engine
3. choose the googlecode's project hosting link

4. Create A New Project by click the new project link

5. Fill all the form such as: project name, licences, labels and etc. And, Please choose any license. (Sorry, I don't give any specific information about every single license for you. If you want to know it, please find it in search engine by yourself). The form is just like the screen shot below :

6. After you push the "Creating Project" button, you will be directed to the list page. Then click the Download Tabs. Please see the screen shot below.

7. After click it. You will see the page below. Then, please click the button "New Download".

Even though it said new download, actually, that link is for upload the JS files. So, after you click it, then you can upload your JS files into the googlecode.com.
8. Fill the form such as summary, and label, and then Click Browse. Upload all your files. Please see below

9. After uploading, you will be given links. Put on your mouse pointer on the link. then copy its link location. Please see the screen shot below.

10. Great, you get the link location. How to use it ...?
Below is the HTML structure. Just change the red which say YOUR GOOGLE LINK LOCATION with your own link.
<script src='YOUR-GOOGLECODE-LINK-LOCATION' type='text/javascript'></script>
example:
<script src='http://cahayabiru6.googlecode.com/files/jquery-1.2.6.min.js' type='text/javascript'></script>
After that, Now you have to put it in the template.
In your template, please find :
]]></b:skin>
paste the code below ]]></b:skin> .
11. OK. You're done.
If you like my article, please feel free to subscribe to my feedburner email feeds. Thanks.
Sunday, February 9, 2014
မူဗီေတြမွာ ျမန္မာလိုစာတမ္းထည္႕ျပီးျကည္႕ျကရေအာင္...

မူဗီခ်စ္သူေတြ ဆရာ.ေတြ..မူဗီေတြကိုျကည္႕ရင္..ျမန္မာလိုစာတမ္းေလးထိုးျပီးေတာ႕ျကည္႕
ျကည္႕ခ်င္ျကမွာေပါ႕.. ကၽြန္ေတာ္လည္းအပါ၀င္ေပါ႕....
အခ်ိန္ေပးေပးျပီးေတာ႕..ဘာသာျပန္ေပးထားတဲ႕.. ကို "သူရ " ကိုဒီေနရာကေနပဲ ..
creadit ေပးပါတယ္...
original link.... https://www.facebook.com/groups/myanmarsub/
Myanmar Subtitle ေတြကုိ Gom Player နဲ ့ၾကည့္ရင္အဆင္ေျပပါတယ္ .. "winnwa" Font ရွိထားဖုိ့ေတာ့လုိပါတယ္ .. Gom Player ရဲ့ Perferences ထဲက Subtitle မွာ Subtitle Font ကုိ "winnwa" Font ေျပာင္းေပးလုိက္ပါ .. .. ပုံမျမင္ရရင္ Full Screen ၾကည့္ေပးပါ .. (အ၀ါေရာင္ေနာက္ခံပံု)
Myanmar Subtitle ေတြကုိ VLC Player နဲ ့ၾကည့္ရင္လည္းအဆင္ေျပပါတယ္ .. "winnwa" Font ရွိထားဖုိ့ေတာ့လုိပါတယ္ .. VLC ရဲ့ Tool > Perferences ထဲက Subtitles & OSD မွာ Subtitle Font ကုိ "winnwa" Font ေျပာင္းေပးလုိက္ပါ ..အားလုံးအဆင္ေျပပါေစဗ်ာ .. ပုံမျမင္ရရင္ Full Screen ၾကည့္ေပးပါ ..

ကားေဟာင္းေတြလိုခ်င္တဲ့သူေတြအေနနဲ႔https://www.dropbox.com/sh/gukxozwgan6y0cy/62hOWZ-Ek3 မွာ ၀င္ေရာက္ရွာေဖြယူနိုင္ၾကပါတယ္။
စာဖိုင္သစ္ တက္တိုင္းသိခ်င္ရင္ေတာ့https://www.facebook.com/groups/myanmarsub/permalink/352116628248124/ ပိုစ္ကို
like လုပ္ထားၾကပါ။
win font မရွိတဲ့သူေတြကေတာ့https://www.dropbox.com/sh/gukxozwgan6y0cy/3rlDuofUF3/WIN_FONTS မွာ ယူနိုင္ပါတယ္။
GOM player နဲ႔ VLC player အသံုးျပဳနည္း တင္ေပးတာ က Jemmy Off ပါ။
ကၽြန္ေတာ္ကေတာ႕ pot player သုံးပါတယ္.. သေဘာတရားခ်င္းကေတာ႕အတူတူပါပဲ..
ေက်းဇူးတင္ပါတယ္..

Activate Hacktivate Iphone Screen Apple ID Iphone 4 IOS 7.0.4

Apple IOS ဆရာသမားေတြ.. ios 7.04 update လုပ္ျပီးေတာ႕
apple ID ေမ႕ေနတဲ႕အခါပဲျဖစ္ျဖစ္...
ဖုန္း၀ယ္ျပီးေတာ႕ID အေကာင္႕ထည္႕မေပးလို႕activate ေပးမလုပ္တဲ႕အခါမွာ
ခုဒီေဆာ႕၀ဲေလးက အသုံး၀င္ပါတယ္..
ကၽြန္ေတာ္လက္ေတြ႕စမ္းသပ္ထားတာကေတာ႕ iphone 4 မွာပါ..
လိုခ်င္ရင္ေတာ႕ဒီမွာေဒါင္းပါ..

video tutorial
Internet Cyclone 2.19 အသစ္

ခုတေလာ ေတာ္ေတာ္ေလးကို နာမည္ျကီးေနတဲ႕ အေကာင္ေလးပါပဲ...
အင္တာနက္speed ေႏွးေနတယ္လို႕ ယူဆရင္ ဒီေကာင္ေလးကိုသုံးျကည္႕ပါ..
ဖုိင္ဆိုဒ္လည္း.. မျကီးပါဘူး.. 1 MB ေလာက္ပဲရွိပါတယ္...
speed ကေတာ႕ နဂိုရွိမွ နဂိုင္းထြက္မွာပါ...
လိုခ်င္ရင္ေတာ႕ ဒီမွာယူသြားပါ..
Decompile SWF & FlV V.5.3
swf ဖိုင္ေတြဖန္တီးခ်င္တာပဲ ျဖစ္ျဖစ္ ... edit လုပ္ခ်င္တာပဲျဖစ္ျဖစ္..
ဒီေဆာ႕၀ဲေလးက ေတာ္ေတာ္ကို အဆင္ေျပပါတယ္..
လိုခ်င္တယ္ဆိုရင္ဒီမွာ..
Wednesday, February 5, 2014
FIFA 2013 play two idevice

- If you have FIFA 13 installed on multiple devices, you can save a Manager Mode or a Tournament game onto iCloud on one device -- then continue playing on another.
- Compatible devices include: iPhone 3GS, iPhone 4, iPhone 4S, iPad, iPad 2, the new iPad, iPod touch 3 (16 GB and above), or iPod touch 4.
- For the best game experience, we recommend playing on iPhone 4S, iPad 2, or the new iPad.
- Device Firmware 4.0 and above required.
Tutorial .. demo
အြန္လို္င္းဘဏ္အေကာင္႕လုပ္နည္... paypal & payoneer


ADF.LY ကို အရင္ ဦးဆုံး signup လုပ္ပါ..
adf.ly မွ ပိုက္ဆံရွာနိုင္တယ္.. ထိုမွတဆင္ရလာတဲ႕ပိုက္ဆံေတြကို
paypal account ႏွင္႕ payoneer accountမွာထုတ္နိုင္တယ္..
(အေကာင္႕မ်ားကို ေဆာက္လ်င္ လိပ္စာ ႏွင္႕ ဖုန္းနံပါတ္ကို မွန္ကန္စြာျဖည္႕ပါ)
paypal အေကာင္႕ေဆာက္ ျပီးလွ်င္ visa တခုခု နွင္႕ active လုပ္ရမည္..
payoneer အေကာင္႕ကို activate လုပ္တဲ႕အခါမွာ ေပးထားတဲ႕လိပ္စာ အတိုင္း ၁ပါတ္အတြင္း စာအိတ္ေရာက္လာပါလိမ္႕မည္
အီးေမးထဲ ကို လည္း ေ၇ာက္လာတဲ႕ လင္႕ကို ႏွိပ္ျပီး.. cart မွာပါတဲ႕ debit no ကို ရိုက္ထည္႕ျပီးေတာ႕ active လုပ္လိုက္ပါ..
မရွင္းပါက မူဗီ ဖိုင္ျဖင္႕ျကည္႕ပါ..
Thank u
By .. YKH